Friday, December 30, 2011

Sewing Recap of 2011

I think it's really good for me to see all the things I've made this year.

I often feel like I'm doing stuff, but not really getting anything done, you know? I mean, I know I've made stuff, but it's just nice to capture it all.

I suspect, however, (OH...I should totally have an ultrasound picture in there somewhere, eh?) (except I'm not quite finished crafting the baby, yet)

Sorry...I suspect, however, that I will have significantly fewer finishes in 2012. :)  The baby isn't due until mid-April, but I never have much energy in my past pregnancies (Nesting? What is THAT?), and I have 2 very active fibroids that, if I don't get enough rest each day, they make my life MISerable. SO...even though I've got a while till the baby comes, I don't envision myself spending tons of hours at my sewing machine. Maybe I'll actually get around to some hand-sewing... :)

Anyways, here's a recap of my 2011!

Here are all the blocks I made for the bees I'm in.
Bee Block Mosaic for 2011


And here is a mosaic of all the crafty things I made (or finished) (or started, then never finished) over the course of the last year.These are in no particular order, by the way. :)


I do, of course, have some sewing goals, and some life goals, for the year ahead, but I'll put those in a different post.  I've got loads of WiPs, I've got loads of fabric set aside for specific projects, and loads of other fabric just waiting to be assigned to a project. 

I imagine that if fabric had feelings, that "waiting for a project" fabric might feel like the puppies at the pound when people come looking for a new pet. They are fondled, they are taken out of their spot, they are admired and told how pretty they are, but yet, they go back on the shelf. :)

I hope you all have a wonderful weekend!

Tuesday, December 27, 2011

Christmas 2011 ~ Oh, the Joy.

Well, it's Tuesday now, the 27th, and we finally ate Christmas dinner tonight. :)  There is no real reason for the delay, except that I kept sleeping through my put-the-turkey-in-the-oven-NOW window.  How was I supposed to prepare a turkey and get it in the oven smack dab in the middle of my nap time?

And I sure needed my nap on Christmas day.

Dave and I were up until after 3am Christmas morning, and we were tuckered out! It was totally worth it, though.

TOTALLY!!

As referenced in my last post, we made a puppet theater for the girls. Other than the curtains and the re-build upstairs, it was done in plenty of time. But the curtains took me a while since I took my sweet time. And the re-build took a while since Dave had to hand screw everything in so as not to wake the girls up with the drill.

See, we went from having only a little tree, and no presents, in the loft area when the girls went to bed Saturday night, to having a large puppet theater and a mass of Christmas gifts in the loft area when they woke up.

That kind of transformation takes time, people. It takes time.

Every morning, Mookie has this tradition, if you will, of stumbling into our bedroom around 7:30 for a bit of a snuggle and to play games or read while we all wake up. So we weren't really worried that she would see anything out of the ordinary before we were ready for her to see it.  And Sprout has this tradition, if you will, of sleeping till about 8:30, so we were all set in that regard.  Once Sprout woke up, we all went downstairs for some breakfast...and to build the hype a bit. Since Mookie hadn't seen any presents under the tree, she didn't really expect anything out of the ordinary, but we kept talking about this BIG surprise, and how excited we were, and how excited she would be, and how much fun we were going to have, etc.

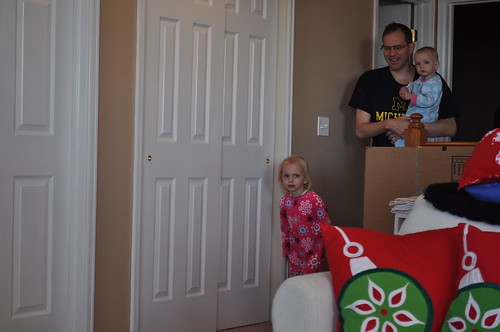
So about 9:30, I went upstairs first to set up the video camera and to hide in the puppet theater to take pictures, and then Dave brought the girls up.

Here's the before (you can see the puppet theater on the left):
DSC_0299


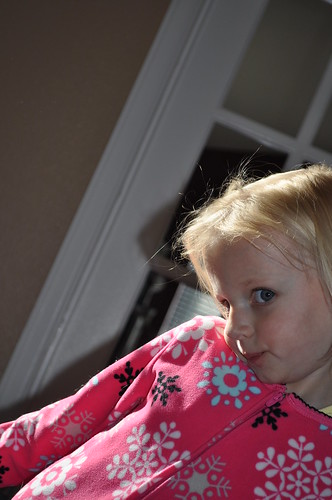
Mookie was so startled by the transformation! You can see the surprise, and fear?, in her face.

DSC_0301


She was actually so scared that she got down on the floor and started to crawl! Poor girl!

DSC_0304


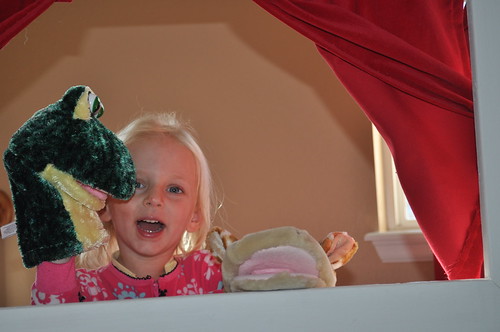
But when she figured out that it was a puppet theater and that it was all good, she jumped up and RAN for the "puppet feetar" as she calls it. :)

DSC_0307

DSC_0308
I love that photo! I love that face!! :)

"Look, Mama! I can do my very own puppet shows!"
DSC_0309

Then she came around back, grabbed the few puppets we had (many more showed up soon!), and commensed to wowwing us with her mad puppetry skillz.
DSC_0312

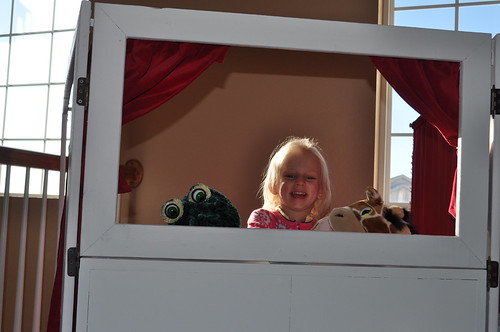
There were quite a few puppet shows that day...and every day since. :)
DSC_0323

Not one to be left out, Sprout was trying to get in on the puppet show action. (LOVE the hair!)
DSC_0328

Here's the whole family before we opened any of the presents. The loft was a WRECK by the time we were all done. Still is...
DSC_0364

Dave gave me a pair of Christmas socks (among other things...like an Accuquilt Go! Cutter) (Score!!) and Sprout desperately wanted to wear them. How can you say no to that cute face?
DSC_0388

Here she is with them on. These are certainly easier for her to wear than my regular slippers!
DSC_0402

This is such a goofy shot of my goofy girl. I love it.
DSC_0410

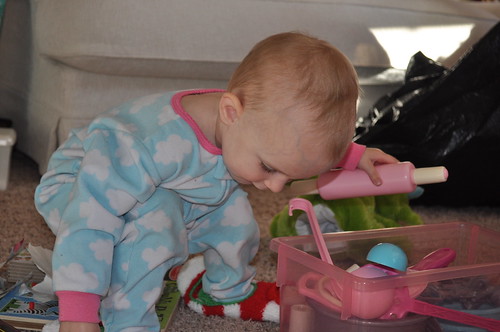
We got Sprout a little kitchen tools set, and both girls really loved it. Occupied them for quite a while, actually.
DSC_0417

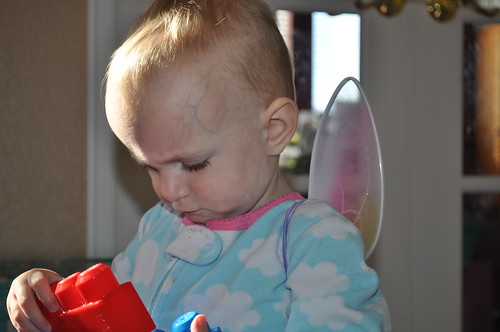
I found these little fairy wings at Target on clearance, and thought Sprout might like them. Well. Little did I know! She immediately said "Ningabow! Ningabow!!" (For Tinkerbell), and held out her arms. I said "Do you want to put these on? And she said "Yup" And I said "Okay." And she said "K."  I just adore this age!!
Her Tinkerbell wings stay on pretty much every moment she knows they're there. We sneak them off every now and then, but when she sees them, she wants them on again.
DSC_0438

I love that she's wearing fairy wings and trying to build something with her Mega Blocks. Every fairy is an engineer, my love. :)
DSC_0453

Here's Dave with his fairy baby.
DSC_0504

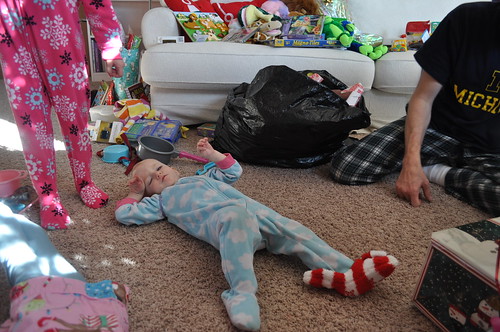
Poor girl. She was just poopin' out, there! We'd only been going for about an hour and a half at this point...
DSC_0519

She found her second wind, though, and got to playing again.
DSC_0582

So, that's it! We took our sweet time, and very leisurely opened all of our presents. It took us about 3 hours, really, but there weren't THAT many presents. We just took. our. time. We read stories. We had puppet shows. We snacked on candy. We played with new toys. We stayed in our jammies all day.

And then we used our new sandwich press to make fancy triangle sandwiches, and then had a nice, well-deserved nap.

Which explains why I slept right through my put-the-turkey-in-the-oven-NOW window, and we didn't eat our Christmas Turkey until 2 days later. It was good, though. :)

Saturday, December 24, 2011

Merry Christmas To You!!


Oh, Blind Hem. I just don't think you and I have much of a future together. You are way too complicated and moody and I just don't have it in me to fuss over something the likes of you!

Velvet, you're not far behind.

The good news is, I was able to finish the red velvet curtains for the El Capitan of puppet theaters that Dave made for the girls. The Mann's Chinese Puppet Theater. The Globe Theater of Puppetry Arts. 

The girls are gonna LOVE it! :o)  I've already got the video camera set up so to record their faces as they enter the Galleria of Gifts.

I wish you all a very happy, very blessed, very meaniful, wonderful, laughter-filled Christmas, and may you know the joy and peace of the Lord in the year ahead. 

Thursday, December 22, 2011

Wavy Prism Bee Blocks

As part of the {Faith} Circle of the do.Good Stitches bee, I have the privilege of being a part of making quilts for people in need every month. The Faith circle gives quilts to people in our church, or Christian community, that need a little uplifting and love quilty style.

Wavey Prism blocks ~ December {Faith} do.Good Stitches Quilt

This month, Kelsey was inspired by Elizabeth"s (Oh Fransson) New Wave quilt and Faith's (Fresh Lemons Quilts) Prism quilt to create a wavey prism quilt. She sent us the design and the color specs for paper piecing these blocks to come together into a very cool quilt.

Here is one block, all by itself:

Wavey Prism block ~ December {Faith} do.Good Stitches Quilt


Here are Taffyjane-Des's blocks:

100_5410

And here are Rachel's blocks:

Faith do. Good Stitches, Dec 2012

Just look how vibrant and colorful and geometric it's gonna be! As I always say, I can't wait to see the finished quilt! And, as always, I would love to make one similar for myself! :)

Oh, and a big HUGE whodathunkit <3THANK YOU<3 to all who voted for my quilted tree wall hanging for Pink Chalk Fabric's Handmade with Love contest. I am in shock that my simple tree won the Deck the Halls category.

Merry Christmas everyone!

Saturday, December 17, 2011

Handmade with Love...

GO VOTE!

(For me...)

At Pink Chalk Fabric's blog. Kathy and her staff asked for tutorials for gifts and decorations that were handmade with love.

There were over 150 tutorials submitted to 3 categories - gifts for friends, gifts for kids, and Christmas decorations.

I submitted the tutorial for the Quilted Tree that I made for Beth, and they chose me as one of the five finalists! Wowwee!!


So, if you would be so kind, please go HERE and vote for my tutorial. :)  (Only one vote per IP address).

And vote for your favorites in the other categories, too. :)

Thursday, December 15, 2011

The Quilted Tree ~ A Tutorial

As I promised in my last post, I've got a tutorial for you on how to make the quilted tree that I made for Beth.

It's really a simple project, and I hope you take the time to make one!

The Quilted Tree ~ Finished


Materials
  • 16x20 canvas for painting. Or any size you want, really. :)
  • 3/4 - 1 yard of white solid cotton or muslin
  • 17 x 21 piece of thin, white batting (this size allows for quilting shrinkage, but is perfect at the end when you wrap your "quilt" around the canvas frame)
  • 7 various Christmas scraps from 2x4.5" to 2x13.5"
  • brown scrap for tree trunk and yellow scrap for star
  • 2 yards pom-pom trim
  • 1/2 yard Heat-n-Bond lite fusible webbing.
  • thread, iron, hot glue gun or staple gun

Steps
  1. Find the size canvas frame you want to use. I used 16x20 because that's what I had. Press your scraps (mine are always kinda wrinkled!) and your muslin. Trim your muslin so that there are 3" extra muslin on either side of where the frame is. And cut it in half along the fold line (opposite the selvage), so that you have two identical pieces of muslin. Your trimmed muslin should be approximately 22x26".


2. Determine the placement of your scrap "branches", then trim them as follows:
2 x 4.5"
2 x 6"
2 x 7.5"
2 x 9"
2 x 10.5"
2 x 12"
2 x 13.5"
The Quilted Tree ~ Are The Branches Right?

3. Fuse Heat-n-Bond Lite to the back of each strip, including the brown tree trunk and the yellow square that will become the star. Trust me on this one...you'll want to put the fusible on the square before you trim it to become a star. :)
 4. If desired, pink the edges of your branches. I did this for aesthetics more than anything since this won't be washed, you don't really need to worry about fraying.

5. With a water or air-soluble pen, draw an outline on your muslin of where the wall hanging will attach to the canvas. This outline should be 16 x 20, and your muslin should be 3" larger, all around, than your outline, making it 22 x 26".


 6. Lay out your "branches" again, to be sure they're in the right place, and then remove the paper backing from the fusible webbing, and fuse (iron) to one piece of the muslin.

 The Quilted Tree ~ Fusing The Branches 

 7. Raw-edge applique the branches to the muslin using a 1/8(ish)" stitch. Again, this is purely for grins. Since this won't be washed and since each branch is fused down, you don't need to worry about the branches going anywhere! I just think it adds to the finished look.


8. Make your quilt sandwich with batting (17 x 21 is much easier when it comes to wrapping it later!) and your other piece of muslin. (I am a spray baster from way back. I don't even know how to use a safety pin!) Then proceed to quilt your swirly snow. I used this tutorial from Leah Day. If you want to get away from stippling, then her blog is THE BEST place to go! Hands down.

The Quilted Tree ~ The Swirling Snow

Don't look too closely at the quilting - it's far from perfect! You can see that I made some large and some small swirls, and I also tried to change direction of the swirls. I don't know if that was necessary, I just thought it would create some movement and dimension.

9. Quilt all the white, then relax your shoulders, allow your eyes to focus again, and admire your quilty goodness. :)


10. Commence to attaching the pom-pom trim for the garland. I found this to be the most challenging part of the entire project. You can see that I used a regular foot, but moved my needle to the left or right as necessary. A friend recommended using an invisible zipper foot, but I don't have one of those. :)  This works, it's just that the trim tends to travel a bit as I'm sewing. But that's okay, garland never lays on the tree perfectly, now does it? :)


11.  I decided my star looked a little lost up there, so I outlined it with yellow embroidery floss. I'm not sure how much it added, but it's just another touch. :)


12. Do a final once-over before you're ready to mount it to the canvas frame. I discovered that I hadn't quilted any snow above the star, so I put the "quilt" back into the machine and did a few more swirls.

12. I placed the "quilt" on top of the frame and made sure it was centered, then I put little pins in the corners just to hold it in place while I permanently attached it to the canvas frame. I used a hot glue gun because that's what I had available, but I think I like this better than stapling it on. It's just much cleaner looking. I'll keep my eyes on it and if it seems to be pulling away from the frame, then I might follow with staples, but it's great for now!


13. Admire your hard work!  And put it in a place where others can admire it, too. :)


And there you have it! How I made a 3-dimensional quilted tree wall hanging! I hope you like it, and if you have any questions about any of the steps, please don't hesitate to ask me!

*I thought of a couple of other ways to enhance this, if you're interested.

One is to drop the garland and make it into an Advent Calendar. I don't know the measurements, but it would be easy to make little pockets in each "branch" simply by making the branch 5 1/2" wide by whatever length, then folding it into almost thirds lengthwise. Then you would sew a vertical stitch every, I don't know, inch and a half or so, then do your 1/8" stitch all the way around. I my head that would make little pockets. If you try it, I hope it works! :) 

Another idea is to make a trio of quilted wall hangings. You could make a tree, and a snowman, and a stocking using the same method, really. Pick your focus fabrics for the tree/stocking/snowman, fuse then raw-edge applique them onto your muslin, make your quilt sandwich, quilt your snow around, add your pom-pom/button/ric-rac embellishment, mount them on the frames, and be extra proud of yourself! :)

I'm sure there are a million ways to take this idea and make it better -- go for it!

If you decide to make one (or three!), let me know! I'd love to see how yours turns out! :)

Have a great week!

Saturday, December 10, 2011

The First Annual FRMQG Christmas Scrap Swap

Last Christmas, I saw a piece of art at my LQS that really caught my eye. It was a canvas, like you buy at Michael's or any hobby store and paint on, but it had strips of green fabric stitched onto a neutral background, then attached to the canvas to make it look like a Christmas tree!


Fast forward a year, to the Christmas Scrap Swap we had in the Front Range MQG, and I decided to make something similar for Beth. We each received a baggie full of Christmas scraps from our partner in September, and we were encouraged to make something for their kitchen. Well, I made her a few things, but I knew I wanted to make this scrappy Christmas tree, no matter what else I made her. :)  I did catch a bit of flack for all the things I made her, but that's okay. She loved them. :)

For her kitchen/dining room, I made a table-runner:
Kate Spain Table Runner for Beth

That's the only kitchen thing I actually made her. :) It seemed SO much bigger when I was binding it than when she held it up. Oh well. She liked it, and that's all that matters. 

Then I took some small strips of fabric and made her a little spool tree:

Scrappy Spool Tree ~ For Beth

If I do it again, I'll figure out a way to make a little stump so the "tree" stands up off the base a bit more, but heck, it was my first try.

And, best of all, I made her my version  of the Scrappy Christmas Tree:
Scrappy Tree Wall Hanging ~ For Beth

Strips sewn on, but there is batting involved, and I quilted some snow around the tree. Then I added pom-pom garland for that extra-special touch. Maybe over the top, but check out her reaction...
I expect her to shoot me for sharing this picture, but I love it too much to keep it to myself. :)

Beth and her Scrappy Christmas Tree

(I'm working on writing a tutorial for how I made it, so check back in a day or two.)

When it was my turn to open the presents, Kate gave me a giant bag, and I was quite intrigued. :)

She took my incredibly random bag of scraps, (I gave her some Alexander Henry Main Street fabric, and a bunch of other stuff that kinda went with it. Sorta.) and made me a really cute wreath! She said she knows I don't like to spend much time in the kitchen lately (hah! or EVER?!), so she chose an anywhere decoration instead.

I have it hanging backwards here, but you can totally see how cool it is with the dangling trees! Love it!

She also made me a little kitchen towel. I don't have a better picture of it than this, and I really  want to finish this post tonight, so take a little of this, and add some imagination, and you'll get to see the whole thing. :) It's really cute.

(gratuitous baby bump shot)
SO...that's me and my give and take from the FRMQG Christmas Scrap Swap. From everyone's reactions, I think it was a big hit, and we'll do it again next year.

Now, please excuse me while I go to bed. I have visions of quilt blocks dancing through my head. :)

Wednesday, December 7, 2011

{WiP} Wednesday - Oh My December Stars!

I promise I haven't fallen off the face of the Earth. I've even been sewing! Not much, but some. Taking care of a 3 year old, a 1 year old and being pregnant with a third is really taxing! Who knew? :o)

Most of what I've been working on has been bee blocks, though I did create a few simple gifts for our Front Range Modern Quilt Guild Christmas Scrap Swap. That was fun. :o)  I plan to do a separate post about that...one of these days.

For now, though, I'm going to tell you what I'm currently working on...since this is a WiP post, and all. 

First, I'm stuck in the final stages of finishing the do.Good Stitches quilts for the homeless family. Final stages. Binding. I don't know why I'm stuck, but I am. I really need to finish them, though. And soon!

Second, today I am finishing a little colored pencil roll that we will give to one of Mookie's little friends for her 4th birthday on Friday.  I used Pynkhope's tutorial, but wanted to make it for 16 pencils, so I enlarged it. I've loved the fabric (from Joann's) forever, and I'm glad to finally be using it!
Colored Pencil Roll {WiP}

I also want to write up a tutorial for the Christmas tree wall hanging I made for Beth for the FRMQG swap. I've got the fabric all ready, I just need to find the motivation! :) Here are the fabrics I'm going to use, though:


Fabric for Quilted Tree


And then I'm going to make an infinity scarf for each of Mookie's preschool teachers. We made the mug rugs for the start of school, so I wanted to come up with something different, yet simple.

Gosh!! I can't believe I didn't blog about that?! Well, yes I can. September kicked my butt. I'm not surprised. Anyways, here's a picture of the mug rugs we made. I "painted" over where she wrote her name since I don't ever put it on here. :)  We used Crayola's Fabric Markers, and OH MAN!!!! Those things are FANTABULOUS!!!  I was incredibly impressed with the colors, with the saturation, with the lack of bleeding. If you do any writing or coloring on fabric, I suggest you fork over the $5 and get a set of them. They are really that good.


I don't plan on making any other Christmas gifts, other than the Shutterfly calendars we do every year. Does that count? I think it should! :)

But I do have at least 3 quilts in my head that I would LOVE to start. One will be secret for a gift that I wanted to make months ago, one will use the yellow and gray hexies I got from our last Flickr swap, and the other will use a rainbow of scraps. I know it's terribly shocking that I want to make another rainbow quilt. :)  I've only made 2. That's not excessive!  And, I've given both away, so it's not like I've got a stash of rainbow quilts by the sofa. I think it's high time to make another. Plus, it's going to be COOL! And different. In a "we've kinda seen this before, but not really" kind of way.

I'm sure there's more that I'm working on, but that's all I can think of right now. I really want to get that colored pencil roll done, so no more computer time for me!

OH...and in case you recall from my last {WiP} post...6 weeks ago...we had the "anatomy scan" ultrasound, and there is, as I suspected, a very healthy baby boy in there. He is very active, and everything appears to be going and growing as it should. So, come April, my world will officially go from pink to blue. :)

Hope you have a great week!

(Lee at Freshly Pieced isn't hosting her {WiP} weekly linky-do till after the first of the year, but I still wanted to do my own :)