Saturday, August 9, 2014

A Whole New World!

I'm very excited about my most recent quilt finish. It's been a long time in the making because I was waiting for a few key elements for quilting: 1. Inspiration, and 2. A ruler base for my long arm. ;)

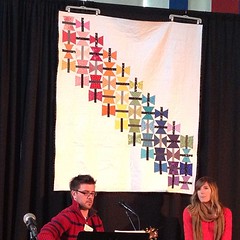
In late June I had the very unique opportunity to spend the day with Angela Walters and a few other VERY exceptionally talented long armers in Denver. The airlines almost didn't let it happen, but Angela persevered, and made it to Denver, and we just really tried to suck as much information out of Angela's brain as conceivably possible in a 6 hour span of time. ;o)

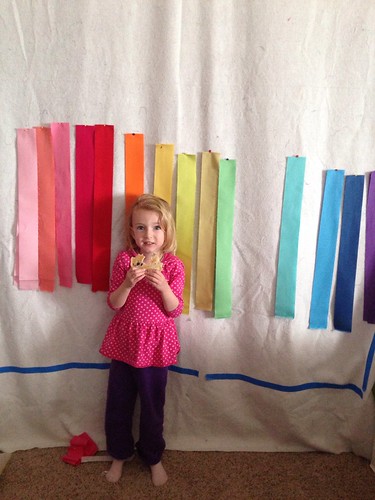
 (Susan (front right) made each of us these little placemats, it wasn't part of our class)

One of the take-aways for me (of MANY) was how to use a ruler for quilting. I have a few quilt tops that are awaiting quilting inspiration, but I only really have one that was right for using the ruler base. (It's basically an acrylic add-on, similar to an acrylic extension table for your domestic sewing machine.)

(this isn't me practicing with a ruler, obviously, but it's the best picture of me and my BFF, Angela!) ;o)

So after that amazing "mountain top" experience, I seriously debated buying a ruler base for my long arm. It was $100, and I just wasn't sure it would be worth it, you know? I spend SO much money on stuff that I don't need or end up using (Hello, Accuquilt Go cutter!), but I decided to take the plunge on this one.

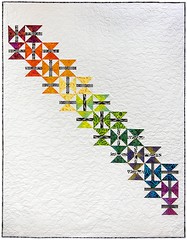
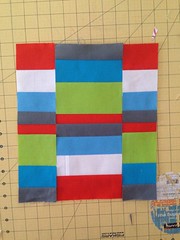
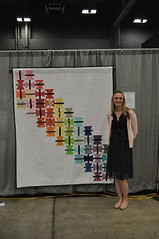
The Shape Shifters quilt that the {Faith Circle} of the Do. Good Stitches bee made in April was perfect for ruler-guided quilting. The problem? I needed to piece the top!! There were a few blocks that I had to re-make because they were trimmed wrong, but it really is an amazingly easy set of blocks to make. (You can find the tutorial HERE) Once I got the top pieced and the backing selected, it was time to get to work!

And WORK it was!! Man alive. Practicing on Susan's long arm for a few minutes was NOTHING like actually doing the quilting on my own quilt, on my own machine. The first block took for. eh. ver. Forever. Or at least four hours, which felt like forever! 


But then I figured out how to stream-line the process a bit, and eventually got to where each block was taking me about 30 minutes. All in all, though, I believe I spent about 20 hours quilting this quilt.

Totally worth it, yes, but goodness gracious! My arms ached, my legs ached, my back ached...Ruler-guided quilting is not for the weak, that's for sure!


Now it's bound, and I'm going to put on the label, and take it to Restore Innocence so they can give it to a girl rescued from sex trafficking.

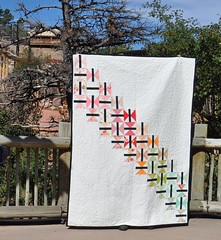
Here are a couple of pictures of the secondary design of the blocks, and the quilting in each.


And one more glamour shot for good measure. ;o)


Sunday, June 22, 2014

Rolling the Dice with Urban Zoologie and Remix

(actually, it's only one. It's a "die", but I didn't like the alternative title.) :o)

I recently had the opportunity to take this adorable panel of Urban Zoologie by Kelle Boyd of Ann Kelle for Robert Kaufman, and make it into something fun for a baby gift.


When I first saw the panel, I immediately saw a giant stuffed die (dice...why are plurals so difficult?!)  I wasn't entirely sure how to make it, but I knew I could figure it out. After a brief consultation with Pinterest, I confirmed my suspicions, and got to work!  (I started with this tutorial by London Mummy, if you want to follow her great instructions!)

I don't think I had to, but I chose to back the panel with interfacing (SF101) to give the fabric a bit more stability. I added a ribbon handle to the side, and thought it would be fun to include a little bell. :o)


All of my kids love this die. It's just FUN! :o)


Since I couldn't make a baby gift without making burp cloths and a receiving blanket, I used some YUMMY Robert Kaufman flannel to round out the gift. If you've never used it, you need to. It feels soooo soft and fluffly and strong compared to other flannels I've used!  (Note: I always prewash flannel, and I used a 1/2" seam allowance)

I know a number of people like to use prefolded Gerber cloth diapers to make burp cloths, and I admit I've made my fair share of those, but I've recently started making my own entirely out of flannel. And I will. NEVER. Go. Back.

Never.

(Never)

I'm not sure I save that much money doing it this way, but I really do love how dreamy these burp cloths are.

I used white flannel for the base, but could easily have used any other color, and made these the same size as the Gerber diapers. And I know no one will be surprised to know that I used some of Ann Kelle's Remix rainbow chevron for the accent and the receiving blanket.


(this is just such a happy sight!)

These are just so soft! And the receiving blanket? Even softer. Not that I want another baby, because I DON'T, but I'd be willing to hold a baby swaddled in this. Mama ain't got no chance for the baby blues with her baby swaddled in this! :o)


All in all, this was a great challenge (not really a challenge, mind you!), and I had fun using Kelle's Urban Zoologie panel and Remix flannels. Love them BOTH!!  Thank you to both Kelle Boyd and Robert Kaufman for the fabric and the chance to make something new and different. :o)

Wednesday, June 18, 2014

{WiP} Wednesday ~ 24/56

I haven't sewn much lately. My family and I just got back from an epic 12-day, 3000 mile road trip in an RV. Yes, it was as exhausting and crazy as you are thinking. It was also as good as you are thinking. :o)

And while it was (technically) possible to have a sewing machine in the RV, it wasn't really possible to sew while in motion, with 3 small children and their constant needs. And their constant motion. And their constant talking. 

Thankfully, I was able to work on my Schnitzel and Boo swap mini at my in-laws' house. I didn't do much, but I did attach the Dresden blades to the background for my partner. Then I hand-stitched them down on the drive home. 
                                 

I don't think it will be that big, though I do want it to be off-set. Here's a picture of just the Dresden plate.

Now my question to you is, how should I quilt it? What do you think?  What would you love if this was given to you?

WIP Wednesday at Freshly Pieced

Wednesday, May 28, 2014

{WiP} Wednesday ~ The May Edition

Do you feel like this time of year is just WAY out of control? I do. And I purposely let a lot of things slide just so that I can stay on top of the things that are mandatory!

We have 2 birthdays in May, the end of the school year for the girls, and the end of the school year for Dave (an instructor), there are always a couple of formal(ish) dinners we have to attend... it's just too much!  Here's one: We had a formal (called a "dining out" in the military) on the same night - at the same time! - as our daughter's art show at school. So, since it was her first gallery opening, we decided to dress accordingly... ;o)  
And we had one girlie girl turn 4, and had a very busy day, but it ended with a big ol' bucket of modern pop beads, and she was happy. :o)

 And the other turned 6, choosing to go to HuHot Mongolian Grill for her birthday.


We had a small combined party at Build-A-Bear for the girls and some friends, which was fun, and not at all crazy! :o)   Then we took the party upstairs to a new restaurant in the mall called PB and Jellies. The girls each got to make their own jar of peanut butter (with fun add-ins, of course!), and enjoy a PB&J kids meal (or grilled cheese, but WHY?)


Crazy as things are, I'm still trying to sew when I can. I decided to not try to sew something for the girls' teachers this year because it would just take too much time and too many brain cells!

I finished this graduation gift for Dave's cousin. T-shirt quilts aren't that hard to do! I know I was intimidated for a while, and then once I realized I was armed with all the right supplies, and could handle it, I did fine!  There are probably a ton of tutorials out there, but if anyone is interested in how I did it, let me know and I'll do a simple how-to. I also made a pillow out of a sweatshirt that was too large for the quilt, so that'll be fun to have on her college bed. :o)


And I have finally finished some AMH feather blocks for my Bee Happy bee, and I'm wishing I had foundation paper pieced them. There is just SOOO much fabric waste! (Which equals time waste, in my book!)


As for my WiPs, there are many. :-/. 

I need to finish quilting my Colorado MQG challenge quilt and get it bound soon. 


I have to make my do.good stitches blocks for the Faith Circle for May.  And...I have a couple of fun baby things to make!! 

Oh, time. Not on my side. :o)

I'm linking up with Lee at Freshly Pieced for WiP Wednesday. :o) Hope you have a great week!

Tuesday, May 13, 2014

It's Giveaway Time at Sew Mama Sew!

Hi there, and if this is your first visit, welcome!


My name is Melissa, and I live in Colorado with my husband and 3 young children. They are all very wonderful, and I am so very blessed to be able to stay home with them! I sew and craft when I can, which isn't as often as I would like, but I do my best. :o)

This week I'll be giving away a few of my favorite things: a Pentel Fabric Gel Roller (which is awesome for labeling your quilts), one of Cristy's glue tips for glue basting (I glue baste EVERYTHING!), a new bottle of Elmer's washable glue (don't pay for the expensive stuff when this works just as well!), a 2-pack of sewing-themed washi tape (so cute!), my latest pattern! (Love Letters), and a set of 2 1/2" x 15" strips to complete the alphabet (26 strips from the Kona Solids New Brights palette). And I'll tuck them all into a sweet little Kona Solids tote by Robert Kaufman.


Oh, yeah! There's a bonus "I love Kona" tattoo! :o)

Comments are now closed. The winner is Comment 50 -- Lethargic Lass! (I'm emailing you now...)

Wanna win it?  Just leave a comment below with your favorite encouragement for moms. I am blessed to stay home with my kids, but I admit to getting discouraged from time to time. (Just keeping it real!)  So tell me what you like to say - or hear - as a pick-me-up. :o) 

(And please make sure you aren't a no-reply blogger! I can't reply to you and tell you you're a winner! That would be sad...) (If you aren't sure, then put your email address in your comment.)

Good luck with this giveaway, and all the others you are entering. I hope you come back and visit sometime! :o)

Here's the link back to the Sew Mama Sew Giveaway page. Go back there and comment on more posts! :o)

*This giveaway will close at midnight MDT on Friday, May 16th, and I will randomly choose a winner and notify you by May 18th.* Again, make sure you aren't a no-reply blogger!

Monday, April 28, 2014

Strip-Easy: Quilt Challenge ~ a future WiP. :o)

I need another project like I need a hole in my head, but Denise at Pieced Brain liked this Shape Shifter block, and suggested I look at her upcoming Strip Challenge.

She's calling it Strip-Easy (like "strip tease", but different) (except I'll be teasing you with my design until the big reveal...) ;) and the idea is to use up the 2 1/2" strips that you already have. No cutting open a new jelly roll, no cutting fabric, unless it's for sashing or background.


So, in reality, my Shape Shifter blocks won't work since I don't have a pile of those strips, but I do have a pile of leftovers from the roll-up of Kona solids from my Love Letters quilt.


I'm not sure if I'm going to make a baby quilt with some of the letters, or if I'm going to make a special quilt that my little girlie requested...both would be awesome, I just need to decide. :o)

But, again. I need another project like I need a hole in my head! :o(

If you want to participate in the Strip Easy Quilt Challenge, go to Pieced Brain's blog, and check it out! There will be some fabulous prizes for the winner!

Other than that, I'm still working on the t-shirt quilt, but I'm waiting on some flannel for the border and backing. So far, so good, though! :o)


Then my Colorado MQG Challenge quilt needs to get to the top of the list. I've got a very short amount of time to complete this, and I have to do it because this all-guild challenge was my dumb idea!

Then there's the matter of quilting  everything I have touched since January...(sigh)

I hope you're all having a great week!

(I'm linking up with Lee of Freshly Pieced for her {WiP}Wednesday post)

Wednesday, April 23, 2014

{WiP} Wednesday ~ And a PATTERN!!

So many WiPs! :o)

Oh, so many.

My first is very exciting. I finally finished and listed this pattern for sale on Etsy!  And it's for sale on Craftsy, too! :)


It's called Love Letters, and it's a pattern for all 26 letters (plus a heart), and each letter is made from squares and pieced quarter circles! Oh, be still my beating heart! :o)

Here's a close-up of the P:


I was inspired by the cover of the ESPN Magazine when Le Bron James was on the cover. See, inspiration is everywhere! ;o)  My hope is that people will use the letters and make personalized quilts. That's expected, right?

I give instructions in the pattern for how to piece quarter circles, but there are loads of tutorials online. I don't use pins or glue. Shocking, I know. ;o)  I just found that the glue made it too difficult, and I found it took a lot more time to use pins, but did not improve accuracy.  Seriously!


Here's my sweet girl playing on the quilt top...which is why this is still a WiP, and not a finish! I'm stumped on how to quilt it!!


(Plus I have 3 other quilt tops that need quilting...shame on me!)

Here's my other gotta-finish-soon WiP -- a t-shirt quilt for Dave's cousin as she graduates from high school.


It's actually a really good project for me right now. I feel like I've only done stressful sewing for so long -- two patterns and quilts for Robert Kaufman at Christmas, a super secret project I can't tell anyone about, and now the alphabet quilt. Sometimes you just need to SEW!!!! I'm not usually a fan of mindless sewing for the sake of finishing another mindless quilt (I like meaning behind my quilts. And patterns.), but it just feels good to sew simple lines and make a simple (yet, meaningful...) quilt. :o) 

I just hope the purple sashing isn't a mistake!

Lots of other stuff on the near horizon. Hopefully I can finish this and start my next must-do-now project and show you some progress next week!

I hope you have a wonderful, and crafty, week!

Linking up with Lee of Freshly Pieced for WiP Wednesday. :)

Tuesday, April 1, 2014

Shape Shifters ~ A Tutorial


Have you ever come across a quilt block and thought, "Man! I wish I had thought of that!" 

Well that happened to me last week when I saw blocks that my friend, Liberty, is making for a charity bee.  I knew my turn with the {Faith Circle} of the Do. Good Stitches bee was coming up, and I needed something quick and easy. (I'm all about quick and easy for these quilts. We give our quilts to Restore Innocence, and these girls wouldn't know a Swoon block from a butcher block, so as long as it's beautiful, why complicate it, right?)

Anyway, Liberty pointed me to this tutorial, and I started to play. Man, I wish I had thought of that!  So, giving credit where credit is due, there are 3 Dudes in Arizona that came up with this method of making a quilt block. I, however, tweaked it a smidge to make my vision come to fruition. :o)

After playing around with color options, I decided to go fresh and nautical with a yellow, white, navy combination. Delicious! Since yellows are tricky to match, to say the least, I decided to send half of the yellow that all of my bee mates will need, and they can match the other half from their stash.  Hopefully that will allow for some cohesion among the scrappiness of the quilt.

You will not believe how utterly simple this is. Prepare to be shocked. :o)

Note: This tutorial is for each member of the Faith Circle to create 8 blocks for April's quilt, not for the entire quilt. :o)

Fabric Requirements (for 8 blocks) 
  • 1 strip mid-to-dark blue (but not navy!) 2 1/2" by WOF
  • 2 strips Kona White (mailed to you with the yellow) 2 1/2" by WOF
  • 2 strips yellow (please use the yellow I'm mailing to you as a guide, please choose a warm yellow (no green tones) 2 1/2" by WOF 
Sewing Instructions
  1. Sew the strips together along the long edge as follows: yellow to white to blue to white to yellow. Use a scant 1/4" seam, and try to sew the strips so that they don't warp or bow.
  2. Press the seams to the darker fabrics
  3. Square off the left side of the strip set, then measure 10 1/2" over, and cut perpendicular to your seams to make a 10 1/2" square. Repeat 3 more times to make 4 squares.

     4. Rotate two of the squares so the stripes are vertical, leaving two with horizontal stripes (as above)
     5. Place the vertical blocks on top of the horizontal blocks, and secure around all four sides using pins
         or glue. You know how I feel about my glue basting! :o)
     6. Sew around all 4 sides using a scant 1/4" seam, as seen below.

     7. Take your two sewn-on-all-sides blocks to the cutting mat and get a long ruler and your rotary
         cutter.
     8. Placing the ruler across the diagonal from one corner to the opposite corner, cut through both
         layers.


     9. Rotate your ruler to the opposite set of corners, and cut across the other diagonal from corner to
         corner again. Open up the cuts and find beautiful, triangular blocks! Voila!
    10. Press the seams to the yellow (center strip), and you are finished!


I see you!

Thank you, Faith Circle, for always being willing to make beautiful quilts for the girls rescued from human trafficking and supported by Restore Innocence.

Again, this method was devised by the guys in Arizona, I just played with the colors so it would look like eyeballs...just kidding. :o)  If you have any questions, please feel free to ask! And if you make a quilt using this technique, let me know!

Wednesday, March 19, 2014

{WiP} Wednesday - Week 12

I've got something pretty up my sleeve!  It's for that new pattern I mentioned last week, and involves the New Brights collection of solids from Robert Kaufman, although I'm not using all of them.

                                         Kona Love❤️
                                                    
My sweet little 3 year old saw the rejects hanging on the design wall and said "Mommy, I love your quilt xylophone!"  So...I guess I know what I'll be making when this is finished!  (I especially love how she called it a quilt xylophone - it's just so like that sweet little girl of mine to transpose her words. :o)  )

Kona Love❤️


And I've been working on another secretive quilt project, that I'll show you in about 4 months...maybe...if I remember...but here's a snippet:


My 5 year old wasn't pleased that I made 2 zippy pouches for our guild swap, and didn't make one for her. (She also didn't like either of the ones I received in return -- more for me!), so she chose these fabrics for me to make a pouch for her (WHEN, child, WHEN do you think I have time for this?????)  But I love this color combination!


Have I mentioned that our guild is participating in an all-Colorado Modern Quilt Guild challenge? Everyone who is participating received 4 fat quarters of Free Spirit Solids in colors that represent Colorado, and we are to make a modern quilt that is inspired by Colorado.  (except two of the colors aren't right in this picture, sorry!)

Colorful Colorado MQG Challenge 
fabrics


Well, I've had at least 5 ideas, but I am VERY VERY VERY excited about the one that I had Sunday while driving to church. It is inspired by Colorado, and Denyse Schmidt, and Latifah Saafir, and QuiltCon, and my heritage...OH, I can't wait to get that started!!!!  However, comma, I must finish the first thing I mentioned...and then the fourth thing I mentioned...and maybe then the second thing I mentioned if I can do it quickly...


I hope you are having a great, and crafty, and productive week!

(linking up with Lee at Freshly Pieced)

Thursday, March 13, 2014

{WiP} Thursday ~ Week 11

I hope you've had a great week. The weeks always go by super fast for me! 

(almost two weeks ago, now!) Last Friday I gave a lecture/trunk show on modern quilting to a local traditional guild, and I think it was well received. (At least the people who came up to me afterwards were nice!)

Here I am showing off the awesome mini quilt Elizabeth Dackson of Don't Call Me Betsy made for me in a swap. (I won the jackpot, didn't I?) She turned it into a pattern if you want to make one for yourself. :o)
                                          

Here's the hexie quilt I made during Madame Samm's Hexie Queen blog hop last fall, and I'm donating it to Crafters For Courage so they can auction it off and raise money to build another Courage House for girls rescued from sex trafficking. I recently read that approximately 1% of the people rescued from sex trafficking have a safe place to go, so they often find their way back into the traps of the pimps. (We all need to do more to end modern slavery.)
                                                        

And this is the longest (and largest!) WiP, my Mod Mosaic bee quilt. The Mod Mosaic bee started 2 years ago, if that gives you any idea. :-). It's a king-sized quilt, and all that's left is the binding. Unfortunately, I didn't think about Susie's Magic Binding technique before I started binding this. :-/ But it's for ME, so it can sit. :o)
                                            

My newest WiP is this improv beauty of solids. I am totally crushing on it! Here is a bit of one of the sections:

And here is a picture of the whole thing. I hope to get it quilted in the next week.


And something I've been wanting for over a year? The Sew Together bag by Michelle of Sew Demented!  It took me a full week (because I kept making stupid mistakes), but I love it!  And, yes. In case you are wondering, I am planning another one. Hopefully it won't take me another year! :o)


Here's the outside. I guess I've been in a gray mood lately! Everything I've done lately, including a super new pattern I'm working on, is gray! No worries, though. Rainbow is still my favorite color, and I'll get back to that really soon. :o)


And, finally, a super cute dumpling pouch and key fob for our Front Range MQG pouch swap on Saturday.


That'll probably be it for things I can show for a while. I've got to get my nose to the grindstone and sew up the new pattern (very exciting and daunting and nerve-wracking and oh-I-hope-this-turns-out-like-in-my-head stressing!)

I hope you all have a wonderful week! I'm planning to post a giveaway -- soon? -- just need to get myself together!

Blessings,
~Melissa

Wednesday, February 26, 2014

{WiP} Wednesday - Week 9

Man, I've missed linking up with Lee for {WiP}Wednesdays! It always kept me on track, keeping WiPs in my face, and keeping me blogging!

Well, I had a little quilty heart-break last fall, and I didn't feel like blogging much. :-(  No big deal, not even really worth talking about, but I've sure missed blogging!

I've been very busy, though! Very. :o) 

I made my Hope Takes Flight quilt two more times, and Robert Kaufman now has the pattern on their website for free.


Here is the one made from a Kona Classics charm pack (and the pattern HERE)
Hope Takes Flight ~ Kona Charm Pack


And here's the batik version (and pattern HERE
HopeTakesFlight ~ Geoscapes Batik


Not too shabby for batiks, eh?  Research has shown that a good number of people enjoy making modern quilts with batiks, and Robert Kaufman wanted to show a pattern that uses both. I'm so thankful they wanted my butterfly pattern for that! :o)

And I did another top secret quilt that I will show you someday. :o)  But now that those three major projects are finished, I'm back to sewing for FUN!  :o)

Like this. I'm not really a fan of stick-you-hand-in-a-bag improv piecing (my brain can't handle all that chaos!), but I do love no-expectations-no-plan improv piecing. :o)  I started sewing strips together, thought the orange strip was too thick, so I cut it down the middle, and sewed the pieces together on opposite sides. Then I decided the whole thing was too wide, so I cut a piece off the left and flipped it. Loved that, so I did it on the right. I really love the way your eye moves across the block, and I love how this is coming together! It's going to be the back of a special baby quilt.

No-plan Improv


The Front Range MQG retreat is this weekend, and I've decided that I'm only going to work on things for ME. No charity blocks, no bee blocks, no gifts. Only things for me (and maybe my children), because I very rarely sew things for me. And I've got a list as long as my arm! :o) We'll see how well that works out...

I hope you have a wonderful, crafty week! Thanks for reading! :o)

Monday, February 24, 2014

Hope Takes Flight ~ Double the pleasure. :)

I've finished Hope Takes Flight 4 and 5.

I've made this quilt five times now! Yes, four of them look very similar, whatever.

One ~ butterflies made by {Faith Circle} members
Hope Takes Flight ~ Above the Stage at church


Two - at QuiltCon 2013 ~ butterflies made by {Faith Circle} members
Hope Takes Flight ~ 2


Three ~ made with Scrumptious by Bonnie and Camille
Hope Takes Flight ~ at the Zoo


Four ~ made from one Kona Classics charm pack
Hope Takes Flight ~ Kona Charm Pack


and Five ~ made from Artisan Batiks: Geoscapes 4 by Lunn Studios for Robert Kaufman
HopeTakesFlight ~ Geoscapes Batik


I kept the making of these last two under wraps since December because Robert Kaufman asked me to write the pattern for this quilt using the Classics charm pack and Artisan Batiks. I said "Are you sure you want me to do this twice?" They said "Yep. We're sure! Get busy, Melissa!"  (I was honestly confused about it for a long time!)

But twice I did! One in solids (= my comfort zone) and one in batiks (=not far from my comfort zone). This collection of batiks from Lunn Studios is really pretty. I love how each butterfly moves more than in the solids quilt. Plus, Nichole at Robert Kaufman told me that there has been a lot of research done lately that shows that batiks are selling really well with more modern quilt patterns. Who knew, right? :)

And NOW, I am pleased to tell you that the patterns are available for free on the Robert Kaufman website! Yeppers, F. R. double E. Free!!  Here is the link for the solids pattern, and here is the link for the batik pattern.

I want to make this one more time, using only two colors (well, three, if you include the black for the bodies!) like my friend Aunt Spicy did. I'll be sure to post it if I ever get around to it! :)

Also...and I would be remiss if I didn't say this...I want to thank YOU for being so encouraging and excited about this pattern from the very beginning! The first and second quilts were made in late 2012 by the members of the {Faith Circle} of the Do.Good Stitches bee, and donated to Restore Innocence for a girl rescued from human trafficking. The response that I got from finishing those two quilts was just overwhelming! Without that, I never in a million years would have considered writing up the pattern (and making it three more times, hah!). And the continued nagging follow-up from a couple of lovely friends really spurred me on to finish the pattern. And then, when I was asked by Robert Kaufman to make these last two for them, to post free on their website, I thought that was the perfect ending to the story.

And while that story is wrapping up, I've got lots more "stories" in my head that will become patterns one day. :)  I just need to find the time!

I hope you have a wonderful week, and thanks again for being so supportive. I most certainly couldn't do this alone. :)

Tuesday, January 14, 2014

Hello Again! {DIY Project Life Cards Tutorial}

Yes, I've been gone forever. I'm sorry. Maybe I'll tell the story sometime.

I've been sewing. A lot, but can't show you most of what I've done yet, but I have been wanting to get back to blogging, and this is my toes-in-the-water post. I'm not converting all my crafting energy to Project Life, don't worry. It's just a little thing I've done lately. :)


I'm trying to keep track of our year with Project Life again this year. Hopefully I'll do better than last year, but seein's how far I got last year, it won't be hard to improve. :)

There are SO doggone many cute Project Life journal cards. So many that I can't hardly choose which ones to use, and get paralyzed in the overwhelming sea of color and icons and shapes and quotes!  Too much! But the other night, as I was putting the girls to bed, I started to play around with my Rhonna Designs and A Beautiful Mess apps on my phone, and I was very pleased to come up with some simple cards that I can print at home! I bought these apps when they first came out, and really love them.

I don't have Photoshop, and while I could get it and learn it, I don't like to spend a lot of time on my computer if I don't have to. Plus, I spend about 30 minutes in the girls' room every night with only my phone, so why not, right?  After I design them, I use the photo editing tool in my iPhone's Camera Roll to crop the cards to 4x3", and then when I print them, they'll drop right into the PL slots.  (Note: I can also print each card as a 4x6" card, and it will work, too.)

Here is a collage of a few others I made. I am laying them out in a Word document and printing them at home. I know I can also have these printed as photos, but I want to be able to write on them.


Anyways, I put a few pictures on Instagram the other night, and a few people asked how I made them, so here is a tutorial. I promise you it is easier than the 400 steps here makes it seem -- I just wanted to be thorough. :)  If you have any questions, please don't hesitate to ask!

Step 1: Create background -- either take a picture of a card or paper you want to use as your background, or create a background in A Beautiful Mess app...that's what I did. :) 
  1. Open A Beautiful Mess, and click on Collage. I then chose the horizontal collage, and picked the top one with only two windows.  If you want to create vertical journal cards, then pick the vertical collage
  2. Click on Color at the bottom, scroll to the color you want to use, and click on it. Repeat for the other window. 
  3. Finally, click on Frame Size and move the slider all the way to the left, thereby removing any sashing between the two windows. 
  4. Click the check mark at the top, then click Done, and Yes. If you want to embellish your background in A Beautiful Mess, then don't click Done. :)
Step 2: Embellish -- you can do any number of things here, to achieve your ultimate design. This is how I created the polka dot background and letters on the Week 1 card at the very top.
  1. Open Rhonna Designs, and choose the background image you just created and saved in your Photos folder.
  2. Tap Crop, and then tap the sunburst icon for Design Packs.
  3. Scroll down and click on Insta Chalk, and then select either of the two frames (second or third from the left). Rotate it and expand it so that it is horizontal and takes up the width of your screen. This is approximately 3" tall and 4" wide.
  4. Next, push the + symbol in the upper left corner, and the Design Packs will open up again. 
  5. Scroll down to Insta Patterns, then scroll to the right and select the large polka dots. Move them to the lower left hand corner, and click the + symbol again.
  6. The Design Packs will open up again, but you want to go to the bottom of your screen and click on the polka dots again, and move them into position next to the first set of polka dots.
  7. Click the + symbol again, and continue choosing polka dots, moving them into place, and clicking the + symbol until you have filled up the frame. There will be some dots to the right of the frame, and that's okay -- you'll crop them off later. :)
  8. Once the frame is full, you are ready to add your words.  Tap Done at the top.
  9.  Click on the T at the top left, and your font packs will pop up. I played around with all of them, and chose a font from Rhonna Fonts 2. Click that font pack.
  10. A text field will open up that says "DOUBLE TAP TO EDIT". Click there, and type in Week 1, then click the small X in the keyboard window. 
  11. Then change the color of the text to the color you would like to use, and then start playing with fonts. You'll see that the font of your text is changing, but the text is not. If you don't like any of the options in that font pack, then gently pull the font bar to the far left, and you'll see the Font Packs open up again.
  12. Play around until you find the font you like, and then increase the size to fill the frame.
  13. To add the dates below Week 1, tap the + in the upper left hand corner, and another text field will open up. Type in January 1-5, change the font color, and then size to the one you want, and move it into place. (Almost done!)
  14. Finally, tap on the edge of the frame, and a pink line should appear around the entire frame with a dot on the lower left. This lets you know that you have selected the frame, and not any of the polka dots.
  15. Click the button in the upper right that has 3 bars, which takes you to the Design Options. With the frame highlighted, click Delete, and your frame should disappear.
  16. Now that you are finished, click the 3 bars in the upper right again, and choose Share at the bottom. I choose Save Image, and it's saved in my Pictures folder on my phone.
Step 3 : Cropping to 3x4" -- I am making these cards 3x4" so they'll fit into the Project Life slots, so that's what these instructions will help you do.  Please note, I have an iPhone5, and this works for me. I don't know anything about any other phones, so I suggest you play around with your features if you have a different kind of phone. :)
  1. Open the image in your Camera Roll (or whatever it's called on your phone).
  2. Click Edit in the upper right hand corner, and then click the Crop icon in the lower right. 
  3. Click Aspect, and then choose 4x3. You can move your image around inside the crop window to get it to be the right size and layout, and then click Crop in the upper right hand corner. 
  4. If it looks right, click Save, and you're done!

I really am having fun playing with these, creating Week cards, creating cards that are meaningful to me and my family, creating cards that I know I will use.

If you're into Project Life, and have these two apps, or other apps like them, then I encourage you to play around and create some of your own, too! It's pretty fun. :)   And if you have any questions (or if I made a mistake), don't hesitate to ask.