

I love it when a plan comes together, don't you?
A few weeks ago, Traci posted a picture of herself wearing a new Infinity Scarf that she had made. I immediately wanted one. Except I wanted to use voiles. I don't believe I'd ever actually gotten my mitts on any of the voiles, but I knew people said they were just LAHVERLY.
Then earlier this week, a quilty friend from out of town emailed me and said she was alluvasudden gonna be in town, and asked if I wanted to go fabric shopping one evening.
Did I?! There's a fabric shop in Denver called Fancy Tiger that I've been wanting to go to a few years, and since her local quilt shop is Joann's (bleck!), we decided to strap in the girlies and go to Fancy Tiger!
I knew that the only thing I really wanted was to see what voiles they had. I admit that I purchased a few other pieces, but that's beside the point. :o) At one point my friend looked over and saw a SALE table. (play "Hallelujah Chorus" here). The first thing I found was the lovely Anna Maria Horner Little Folks Kiwi solid voile. It's such a beautiful, fun, bright, springy color. And the feeling of the voile is just dreamy. It's delicate and flowy and drapey and rich and silky. I knew I needed some of that regardless of whether or not I found anything else! But then I found the equally lovely AMH LF Four Square Sweet voile. I wasn't sure how they went together, but I set them on the table, and stepped away. From a distance, they looked really good together, so I, not knowing anything about making an Infinity Scarf, asked for 1/4 yard of each. My friend decided she wanted to get 1/2 yard of each. Sweet!
After we got home and I put the girls to bed, I spent an inordinate amount of time on the web searching for patterns. Cart before the horse, anyone? I didn't find a single one that I liked. Anna Maria Horner even has a tutorial on her blog, but she used 1/2 yard cuts - one of her Innocent Crush velveteen and one of a voile, and she didn't say how much of each fabric to use, so I couldn't really use her tutorial. I was a bit nervous that 1/4 yard wouldn't be enough, but I decided to give it a shot. It's a scarf, for Pete's sake, right?! :o)
So, since I couldn't find a tutorial I liked for me, here's one for you.
Materials:
1/4 yard of two coordinating fabrics, any material you like, really. If you want to have a solid scarf, then just use 1/2 yard cut.
*Note: the voiles happen to be 54" wide, so if you use something else, you will need to compensate for that! Which I think is just one more reason to use voiles!
A ton of pins
Thread
Hot Iron
Steps:
(1) Trim your voiles (I'm going to speak of voiles here because that's what I used and you should, too) so that they are identical in size and the edges are straight. It can be 9" wide, or 9 3/8" wide, or 8 7/16" wide, it doesn't matter. Just straight and identical.
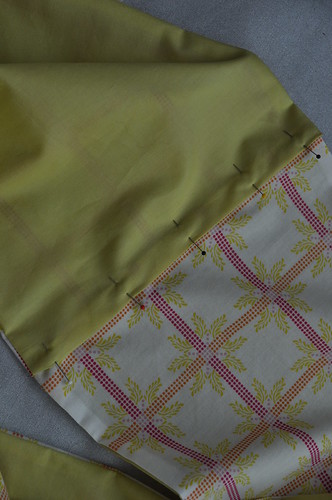
(2) Put right sides together and pin, pin, pin. It can be tough to find the right sides with voiles, but I found it doesn't really matter. These are slippery, so pinning now will make your sewing life SO much easier!
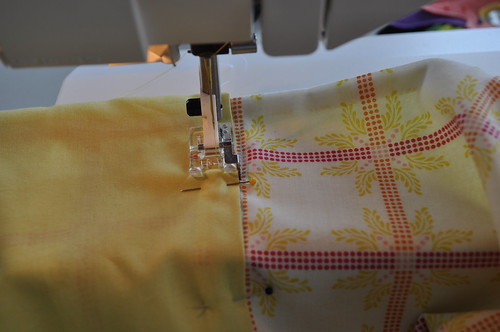
(3)Next you want to sew along the long edges only. I used a 3/8" seam allowance because I've never sewn with voile before, and I read that it's smart to use a little wider seam allowance. (Note: I added some notes at the bottom about how I learned a different way. I think it's actually easier. And much tidier!)
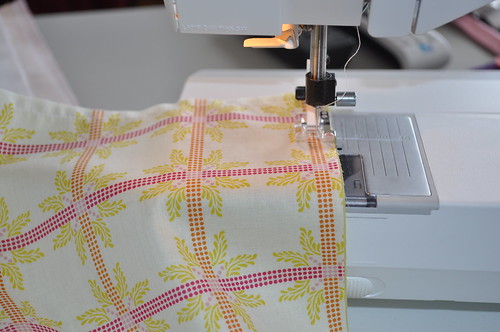
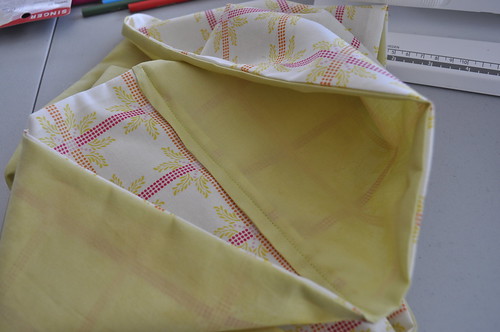
- (4) Now you have an inside-out tube. I pressed the seams flat to set them, then I turned it so that the right sides were out, and the seams were hidden.
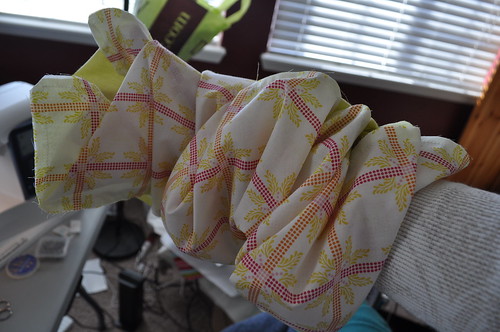
- (5) Then, because the tube was a bit puffy, I decided to iron the sides so the scarf tube was flat. I don't know if you have to do that or not, but I did.
- (6) Now to take the scarf to infinity ∞. Some people call this a "circle scarf," but I'm a nerd, and I wanted mine to be a true infinity symbol where there is no beginning, and no end, and there is a twist. Either way, you now have to put your two short sides together and sew them. I don't know much about sewing, but I know I'm not very good at it, so I have to take extra steps to make the final product look right. You might not have to do this next step.
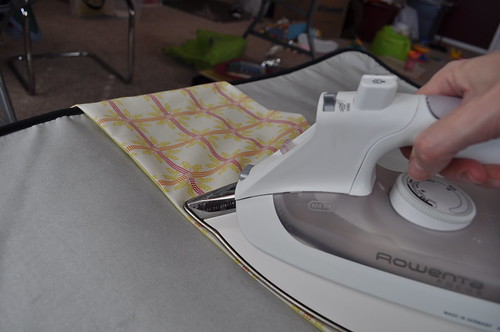
- In preparation of joining the short sides, I ironed down a 1/4" fold on one of the short sides.
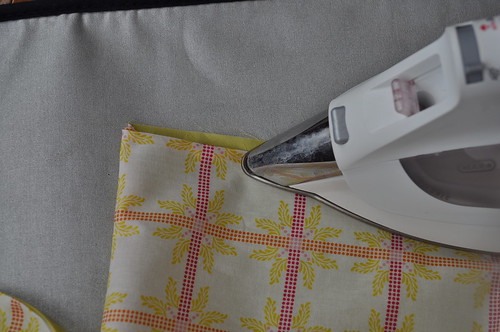
- (7) Next I took the other short end and put it about 1/4" inside the folds. In keeping with the desire for this to be a true infinity ∞ scarf, I twisted my scarf tube one time so that the intersection would have the solid on one side, and the print on the other. Then I pinned it.
- (8) Anna Maria says you should hand stitch this intersection using a blind stitch. I chose to machine sew that intersection for a couple of reasons. (a) I forgot that she said to hand stitch it. (b) I don't think it's necessary since I used 2 voiles, and she used a velveteen and a voile. I did use a matching thread for the green, though. :o) I don't think the hand sewing vs machine sewing really matters in the end. I'm sure it would look more professional and more finished and less like a 9 year old did it, but I've been wearing this scarf all day, and it hasn't bothered me one bit!
And you are FINISHED! What did that take you, about an hour? If that? With a cookie break?
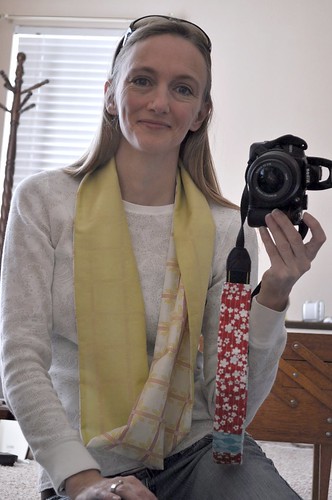
You can wear it a few ways, either one long loop.
Or two short loops.
I like it this way because it keeps my neck nice and toasty warm.
(ETA: To accomplish the double loop, I first put it on long, as one loop, then I grab the bottom, twist it once close to my neck, and then take the larger loop in my hands and put that over my head. Once both loops are on my neck, I can finagle them to be comfy.)
You could also have one long loop and one short. I don't have a picture of that, but you've got a vivid imagination, right?
(ETA also: I discovered another way to make it so that the seams are actually hidden or sealed. It's just a bit hard to explain, so if you have questions, please don't hesitate to ask!)
Here goes: (picking up after Step 2 above)
Step 3. Pin right sides together. Stitch (3/8"-ish seam) almost all the way around, but leave a 3-4" gap on one of the long sides near a short side. Clip the excess fabric at the corners, but not the stitches! :)
Step 3. Pin right sides together. Stitch (3/8"-ish seam) almost all the way around, but leave a 3-4" gap on one of the long sides near a short side. Clip the excess fabric at the corners, but not the stitches! :)
Step 4. Reach into the tube and reach all the way to the opposite short end. Grab it and pull it up to the near short end. You will need to give it a slight twist so that the white fabric from one short end touches the green from the other short end. (This is SO hard to explain!!). You'll need to press out the corners so they're as pointy and square as possible. Now, stuff the inside short end into the corners of the outside short end and pin. Sew a second seam to attach those two short sides together.
Step 5. Pull the right side of the tube out through your gap, and straighten it as much as possible. You should be able to see your seam where the white fabric is stitched to the green, and on the reverse, the green is attached to the white. (Gosh. Maybe I need to try to do a video of this?) Anyway, I took out my Best Press and pressed the seams all the way around. I just like to do that because it looks SO crisp!
Step 6. Hand-stitch your 3-4" gap closed, and admire your work!
Step 6. Hand-stitch your 3-4" gap closed, and admire your work!
If you make this, let me know how it goes!
Wowza! Love it. Awesome tut my friend.
ReplyDeleteIt looks amazing! Such a good call on the kiwi and the print! No way I am going to get my car out of the snow till the sun rises to help me, so I think I will get started on my copycat scarf right now! Totally understand your instructions!
ReplyDeleteps. totally love the fabrics in your banner!
ReplyDeleteNow I need one! Now...I just need to find the time and fabric.
ReplyDeleteWhen I visit my fiance I go to Fancy Tiger as well. We miss you in the LA guild but hope you are settling in to life in -15 degree weather.
ReplyDeleteGreat tutorial! Love it!
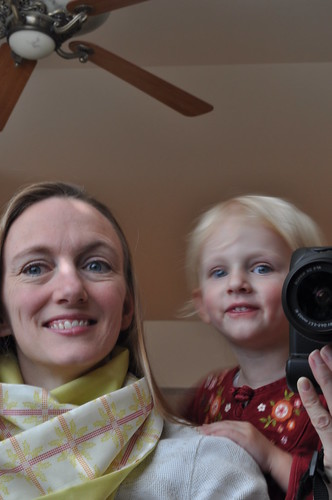
ReplyDeleteit's so nice to see your pretty face!
ReplyDeleteoh, and the scarf is cute too!
Saw Traci's post (she's SO inspiring!!)
ReplyDeleteOrdered My VOILES : D !!!
I am totally going to make one! Thanks so much for the easy-to-follow tutorial! :)
ReplyDeleteHi Melissa, got here via a nice comment you lef about my Birdie Stitches blocks. You and your daughter are like identical twins born years apart! So adoreable! I love the project of the infinity scarf and will make one (probably today) Thank you!
ReplyDelete