Hiya!
Welcome back! Thanks for coming back! I've been spending my spare time sewing, and not blogging, although I haven't been spending that much time doing either! :)
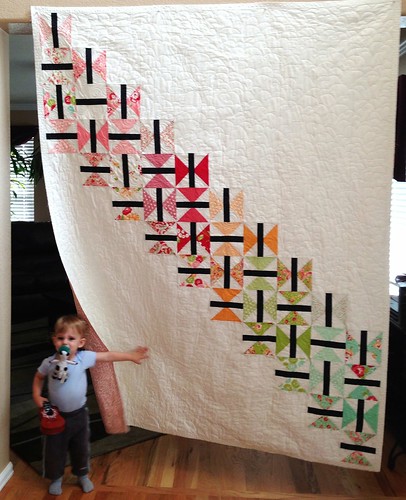
I've been working on finishing my third butterfly quilt (Hope Takes Flight 3.0) using Scrumptious by Bonnie and Camille and Moda Bella solids. (I've been working on writing the pattern for it.) (Very exciting and very intimidating!).
And I've been working on another top secret project. I can't wait to get to show it to you and tell you the story. I can say, however, that it does not involve any fabric companies or books or magazines. It just involves family. A legacy. Heritage. And I'm pretty stoked about that. :) If you follow me on Instagram, then you know what I'm working on. I'm fairly certain the secret is safe here, but I don't want to blow my cover! ;o)
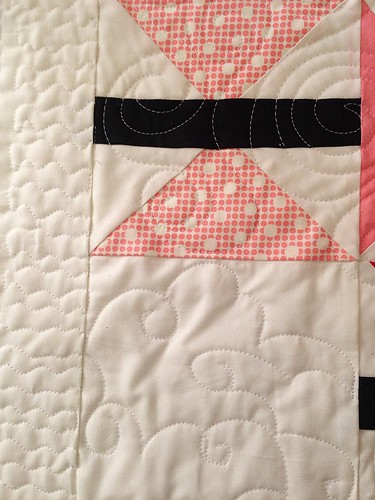
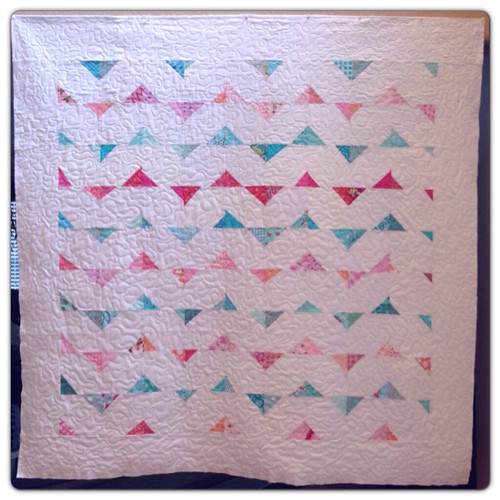
So, back to the butterfly quilt. I finished the quilting on Monday night, but still need to bind it. I quilted swirls on the butterflies (like a broken record), and CLOUDS in the open space, and squiggles in the thin border.
Can we just talk about those clouds for a sec? OH. MY. GRANNY!!!!! I love them more than warm brownies on a cold day. More than a full tank of gas and no one else in the car. More than a rainbow array of Aurifil thread. Well...maybe not that much, but they were SO fun!!! And different! (I love different).
And so easy. I'm not kidding. Free-motion clouds are no harder than free-motion swirls, and easier than pebbles. I promise!
You should try them.
I've got to get back to my secret project, but I am glad I got to show you my butterfly quilt. (again!). :o)
I hope you have a wonderful, and crafty, week!
Linking up with Lee at Freshly Pieced for {WiP} Wednesday.
Wednesday, September 18, 2013
Monday, September 2, 2013
Making Super Hero Capes ~ with Arms!
A week or so ago, my oldest was invited to a birthday party for a boy in her class. They only started 2 weeks ago, so I was a bit unsure of what to give, not knowing him or his family. You know how some people expect a purchased gift for their child, and others feel like their kids already have too much crap stuff, and so a simple gift (that they will actually play with for more than 8 seconds) is fine? Man, I was hoping that Jack was one of the latter, but I didn't know! I texted friends, I asked Instagram...what do you do for a 6 year old boy? Legos, books...all good, but it's more stuff! Our children already have too much stuff
Well, then I had a revelation. Jack's party was a super hero theme, and they asked guests to dress as their favorite superhero or princess for the party...a party at the park. In the middle of the day. I wasn't too keen on having my girls wear their princess dresses to the park on a hot day! That's a recipe for misery and whining if you ask me! :) So I decided to make the girls a super hero cape, and one for Jack as well.
There was one thing I knew I wanted. Arms. I wanted the capes to attach on their arms, not their necks. I mean, come on!! Kids run, and jump, and swing, and slide, and sit, and sleep in their super hero capes, so why would I want to have them attach at the neck? That's just crazy talk! So I hopped on over to Pinterest to find a tutorial for a cape with arms, and what do you think I found? Zip. Nada. Zilch. Well, that's not true. I did find one tutorial where she made a cape for a toddler with a fat quarter. And it was what I wanted, but I didn't want to put in that much time and effort. I also found another tutorial for up-cycling a man's t-shirt into a super hero cape, but it attached around the neck again. :-/ Drawing blanks...
I happened to be near a thrift shop, so I stopped and grabbed a few t-shirts, thinking there had to be a way to make super hero capes that were easy and fun! I washed them. No inspiration. I dried them. No inspiration.
I cut one up...
...pppppphhhhhbbbbbtttttt. Not quite what I was going for! (She was even less impressed than I was!)
And then after I put the kids to bed, I had an idea! What if...I cut the collar to make the arms?! Could it work?
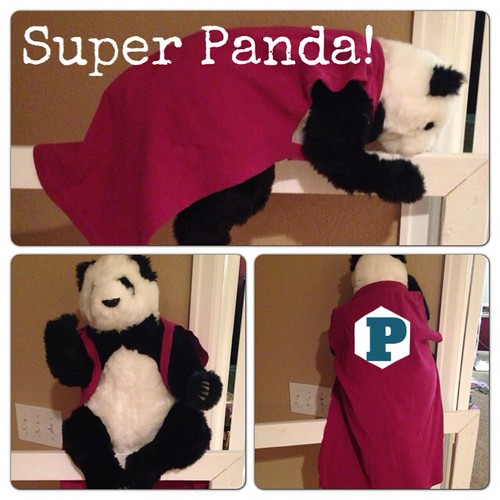
I commenced to cutting some more, and since the girls were in bed, I had to rely on an inferior model. One that seemed more compliant, though probably not as willing to run around the yard. ;)
So then I started to really pay attention to what I was doing so I could share it with you! Because while these are NOT going to be the best selling capes on Etsy, they are good for playing in, and most kids need to play - and imagine - more. Amen.
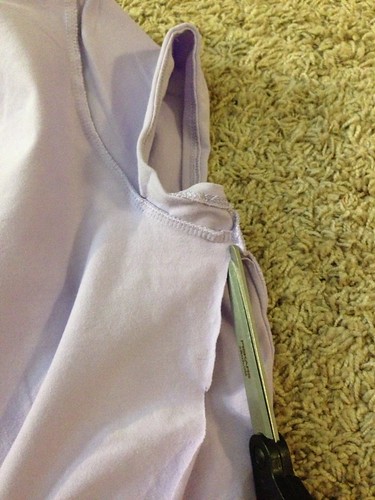
1. After you have washed your thrifted shirt, cut up each side to the armpit. If there is a seam, cut on the back side of the seam so it won't be there when the shirt becomes a cape.
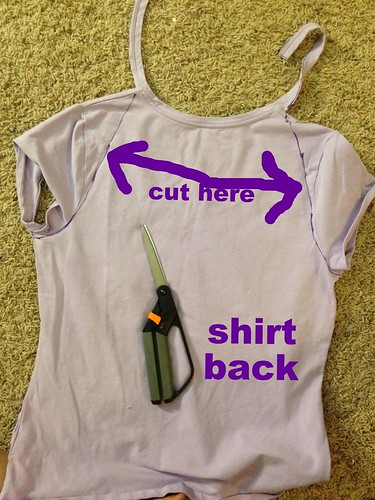
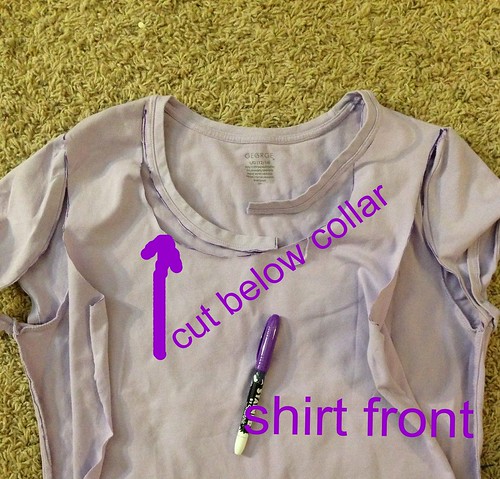
2. My pictures don't quite reflect this, because I figured it out later, but on the back of the shirt, from the armpit, you want to cut at an angle (see the purple marks) on the inside of each sleeve seam, up to the shoulder seam about an inch away from the collar, then crossing over the shoulder seam, cut along the bottom of the collar all the way around to the other shoulder seam. Go back to the center of the collar, and snip it right in half.
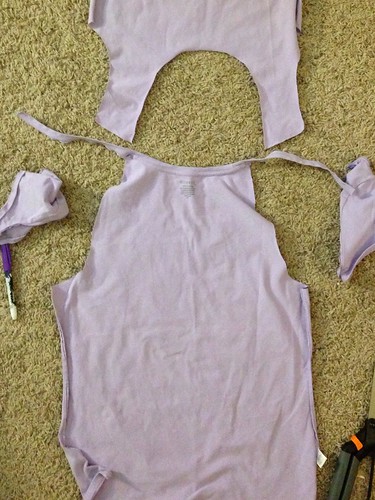
3. Now, rather than continuing down the front, which you can definitely do, I went back to the other armpit, and cut up to the shoulder seam at an angle, to the point where I had just cut under the collar. Hard to visualize, maybe, but this is what it looks like when it's finished.
You can also cut away the front, and then the back (like I did in the pictures), but you can do it in fewer steps the way I just said.
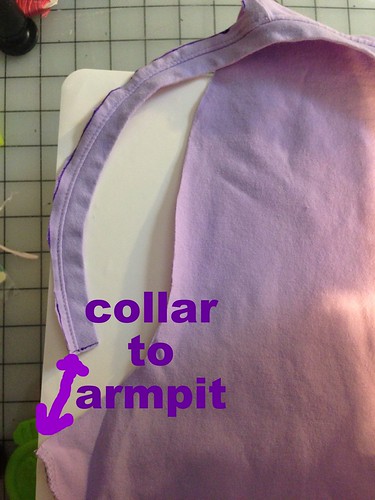
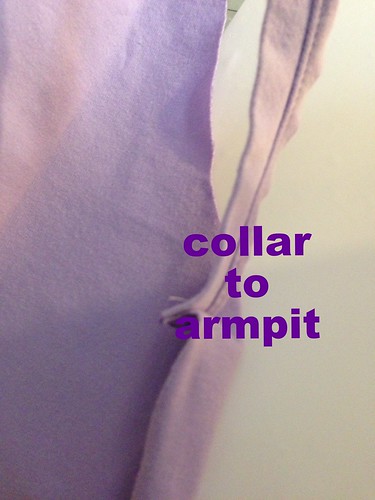
4. Now that you've only got the back and the collar, it's time to make the arms. (I honestly can not tell you HOW excited I am that their capes don't have choke-collars!) Take the left collar-half, and bring it down to where the armpit met the side seam. There's a little corner there, and it's the perfect place to attach the collar. I measured each girl to make sure this location of attachment was good enough. It's not necessary, but I matched the outside of the collar to the outside of the t-shirt, and pinned them together. Then I went to the sewing machine and used a zig-zag/overcast stitch to fix the collar to the side seam. Repeat for the other side.
You can see below, I had to make some drastic modifications for my littlest one's arm holes. Attaching at the corner like I did with the others was just TOO big for her. This made it much more manageable. :)
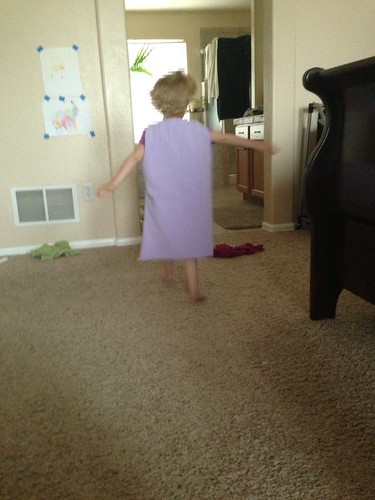
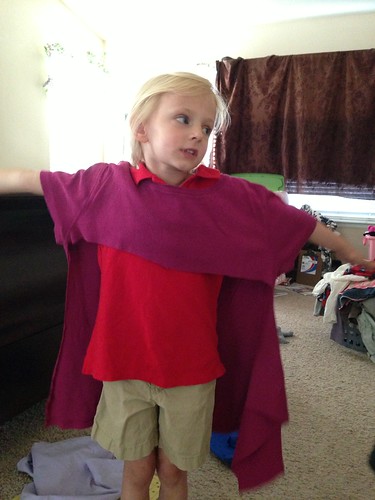
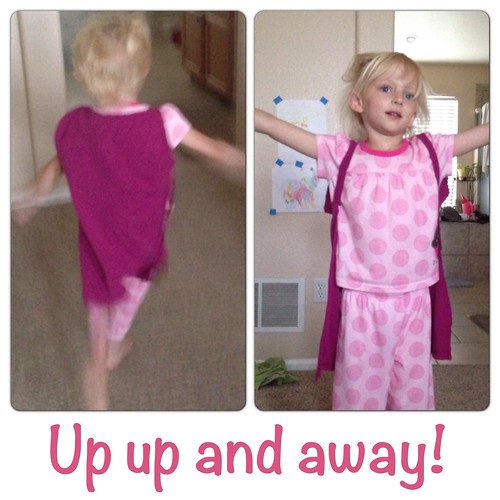
Here you can see my big girl modeling hers.
Much better this time! :)
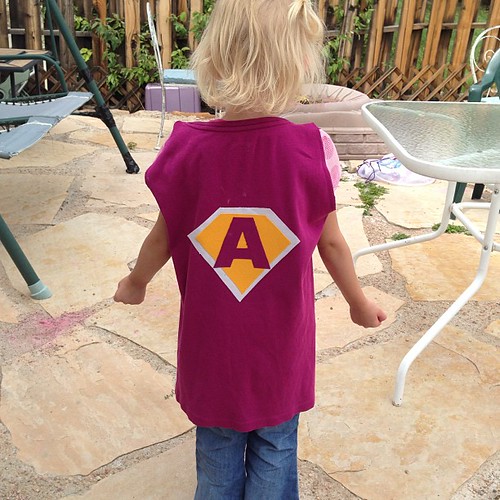
After I got the capes made, next I had to embellish them and put shields on! I'm not going to go into that here -- this is long enough already -- but it was simple applique. I cut the shield shape out of freezer paper, and used it to cut my white out of woven cotton. The yellow (another thrifted t-shirt, of course!) and pink (from the front of her shirt) were knit, so I attached fusible interfacing (don't know the brand, sorry!), and then cut my shields out and ironed them onto the white. Then I cut out the letters, fusible interfacing again, and then sewed them all (1/8" seam allowance) to the capes.
Here she is wearing her finished cape:
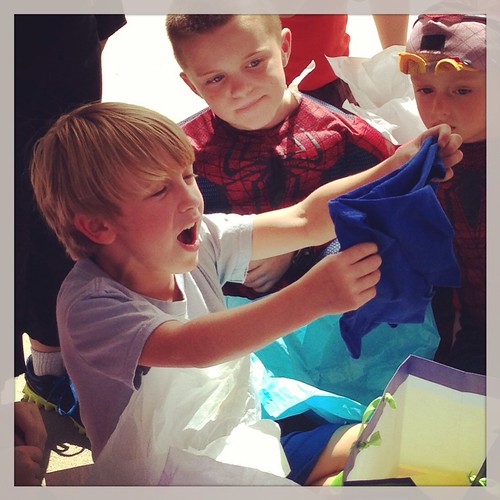
And here is the birthday boy opening it up, putting the "awe" in "awesome!". :) He had great responses for every single gift.
There you have it! A super hero cape made in two days flat! ;-) (It won't take you NEARLY that long!) I know this is a long post, but I hope it makes sense! Give it a try! If you have any questions, let me know. I'm happy to help. :)
As I stated, I was inspired by those other two capes that I linked to. I have never seen a cape like the ones I designed, though I looked high and low. If someone else has already made one, I am happy to link to that tutorial , although I won't say I was inspired by them. Because I wasn't. :) If you would like to notify me of another super hero cape like this, please feel free to email me at the address listed in my profile. Thank you for being polite.
Well, then I had a revelation. Jack's party was a super hero theme, and they asked guests to dress as their favorite superhero or princess for the party...a party at the park. In the middle of the day. I wasn't too keen on having my girls wear their princess dresses to the park on a hot day! That's a recipe for misery and whining if you ask me! :) So I decided to make the girls a super hero cape, and one for Jack as well.
There was one thing I knew I wanted. Arms. I wanted the capes to attach on their arms, not their necks. I mean, come on!! Kids run, and jump, and swing, and slide, and sit, and sleep in their super hero capes, so why would I want to have them attach at the neck? That's just crazy talk! So I hopped on over to Pinterest to find a tutorial for a cape with arms, and what do you think I found? Zip. Nada. Zilch. Well, that's not true. I did find one tutorial where she made a cape for a toddler with a fat quarter. And it was what I wanted, but I didn't want to put in that much time and effort. I also found another tutorial for up-cycling a man's t-shirt into a super hero cape, but it attached around the neck again. :-/ Drawing blanks...
I happened to be near a thrift shop, so I stopped and grabbed a few t-shirts, thinking there had to be a way to make super hero capes that were easy and fun! I washed them. No inspiration. I dried them. No inspiration.
I cut one up...
...pppppphhhhhbbbbbtttttt. Not quite what I was going for! (She was even less impressed than I was!)
And then after I put the kids to bed, I had an idea! What if...I cut the collar to make the arms?! Could it work?
I commenced to cutting some more, and since the girls were in bed, I had to rely on an inferior model. One that seemed more compliant, though probably not as willing to run around the yard. ;)
So then I started to really pay attention to what I was doing so I could share it with you! Because while these are NOT going to be the best selling capes on Etsy, they are good for playing in, and most kids need to play - and imagine - more. Amen.
1. After you have washed your thrifted shirt, cut up each side to the armpit. If there is a seam, cut on the back side of the seam so it won't be there when the shirt becomes a cape.
2. My pictures don't quite reflect this, because I figured it out later, but on the back of the shirt, from the armpit, you want to cut at an angle (see the purple marks) on the inside of each sleeve seam, up to the shoulder seam about an inch away from the collar, then crossing over the shoulder seam, cut along the bottom of the collar all the way around to the other shoulder seam. Go back to the center of the collar, and snip it right in half.
3. Now, rather than continuing down the front, which you can definitely do, I went back to the other armpit, and cut up to the shoulder seam at an angle, to the point where I had just cut under the collar. Hard to visualize, maybe, but this is what it looks like when it's finished.
You can also cut away the front, and then the back (like I did in the pictures), but you can do it in fewer steps the way I just said.
4. Now that you've only got the back and the collar, it's time to make the arms. (I honestly can not tell you HOW excited I am that their capes don't have choke-collars!) Take the left collar-half, and bring it down to where the armpit met the side seam. There's a little corner there, and it's the perfect place to attach the collar. I measured each girl to make sure this location of attachment was good enough. It's not necessary, but I matched the outside of the collar to the outside of the t-shirt, and pinned them together. Then I went to the sewing machine and used a zig-zag/overcast stitch to fix the collar to the side seam. Repeat for the other side.
(not small enough!)
You can see below, I had to make some drastic modifications for my littlest one's arm holes. Attaching at the corner like I did with the others was just TOO big for her. This made it much more manageable. :)
Here you can see my big girl modeling hers.
Much better this time! :)
After I got the capes made, next I had to embellish them and put shields on! I'm not going to go into that here -- this is long enough already -- but it was simple applique. I cut the shield shape out of freezer paper, and used it to cut my white out of woven cotton. The yellow (another thrifted t-shirt, of course!) and pink (from the front of her shirt) were knit, so I attached fusible interfacing (don't know the brand, sorry!), and then cut my shields out and ironed them onto the white. Then I cut out the letters, fusible interfacing again, and then sewed them all (1/8" seam allowance) to the capes.
Here she is wearing her finished cape:
And here is the birthday boy opening it up, putting the "awe" in "awesome!". :) He had great responses for every single gift.
There you have it! A super hero cape made in two days flat! ;-) (It won't take you NEARLY that long!) I know this is a long post, but I hope it makes sense! Give it a try! If you have any questions, let me know. I'm happy to help. :)
As I stated, I was inspired by those other two capes that I linked to. I have never seen a cape like the ones I designed, though I looked high and low. If someone else has already made one, I am happy to link to that tutorial , although I won't say I was inspired by them. Because I wasn't. :) If you would like to notify me of another super hero cape like this, please feel free to email me at the address listed in my profile. Thank you for being polite.
Tuesday, August 27, 2013
Hexie Queen Blog Hop
Welcome to my little stop on the Hexie Queen Blog Hop!

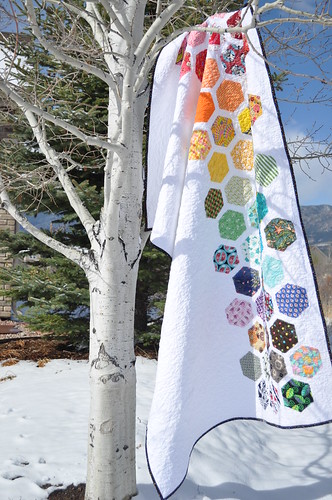
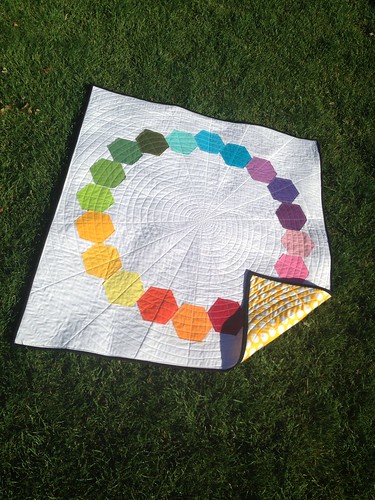
I was really humbled when Madame Samm contacted me asking if this rainbow hexie quilt was actually mine. It was. :)
A friend had sent her a picture from Pinterest, and she wasn't sure how to get to the original blog post and quilter. She found me, though! :) She told me all about the Hexie Queen Blog Hop, and it sounded like SUCH fun blog hop that I jumped in feet first! :)
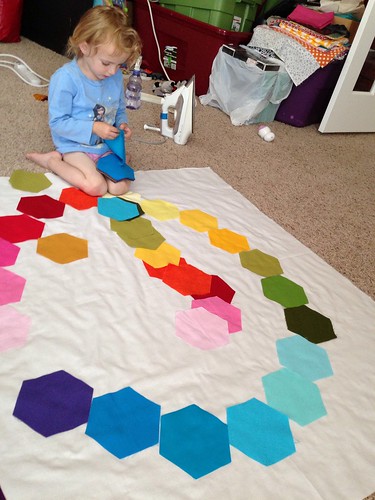
So one Saturday, when I was supposed to be working on a million other things, including potty-training Little Bird, I decided to start my hexie quilt instead. She helped. ;) A couple of years ago, I participated in 5 rounds of the Hexie Swap on Flickr, and one round was all solids, so I had about 50 pre-cut hexagons, just waiting for a project! They were cut with the Accuquilt Go cutter, and they're perfect for a quick project like this!
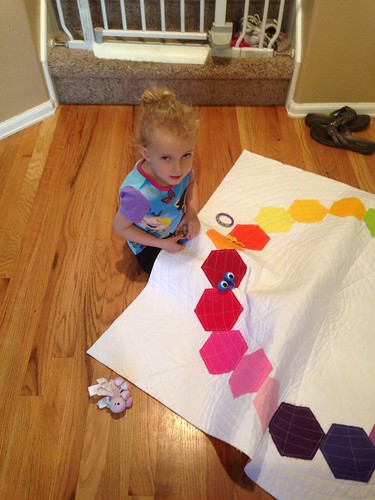
Once Little Bird and I had decided on the colors we wanted to use, I set her free with her own stack of hexagons so she could make "her own" quilt. She didn't really do much with hers, but it gave me the chance to get mine all laid out. :)
Once I had the layout I liked, I adhered the hexies to the top of the 44" square of Kona White. I used the same method I used when I did my first hexie quilt. I sprayed the back with spray baste, and pressed it down with my hand. If I needed to adjust it, I could.
The next step was to heat set the hexies in place with a hot iron. I used a random scrap of fabric to protect my iron from any overspray of glue.
The beauty of heat-setting them this way is that when I inevitably had to put the quilt away, I could go away trusting that the hexagons wouldn't move a millimeter. And little hands couldn't move them, either. Security is a good thing when you've got curious little helpers around the house! :)
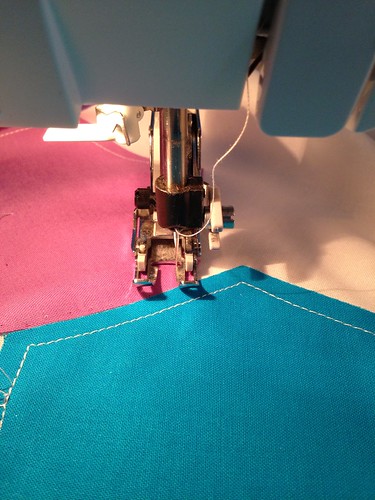
A couple of hours later, I was able to come back to the quilt. I raw-edge appliqued each hexagon in place with a straight stitch 1/4" in from the edge. I didn't want to stitch over any other stitches, so I stopped where I started, and tied a knot on the underside of the quilt top.
When the quilt top was finished, I just felt like singing! It felt soooooo good to put the must-do list aside and just follow the inspiration for once!
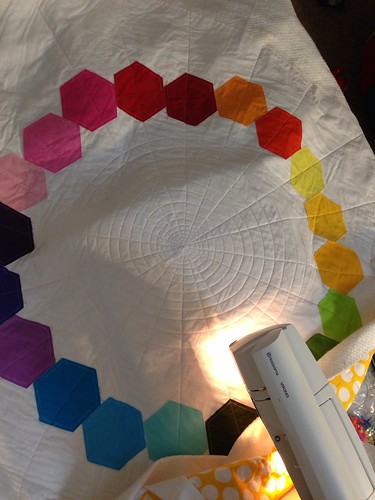
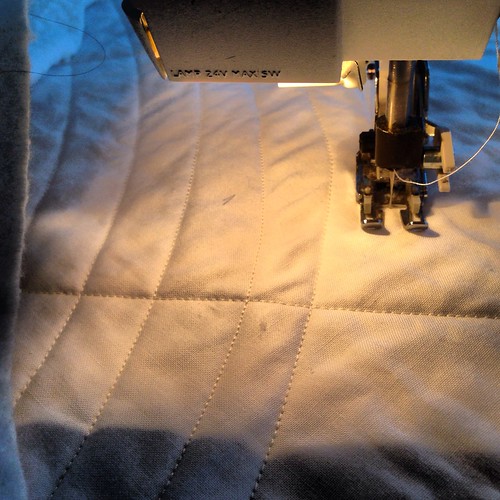
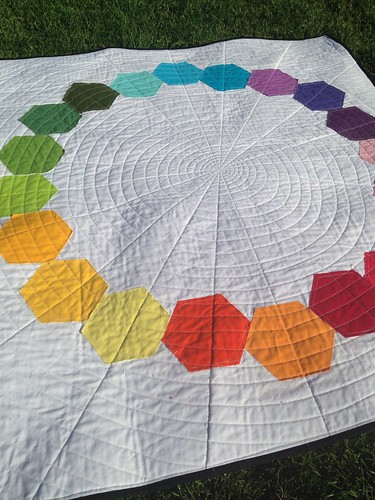
And then it came time to quilt it. I had a hundred ideas (and two more after I started, ain't that always the way!), but I went with a straight line between opposite hexagons, and then a spiral throughout the whole quilt.
Spiral quilting takes foreeeevvvvvvvvvvver! :) And this is a small quilt! I can't imagine doing it on a larger quilt. Sheesh!
Here's Little Bird claiming "her quilt" once again. :) I've never made a quilt just for the fun of it, so I've never had the chance to have one of my children claim it as their own. I'm not sure if she really thinks this is for her, but, other than it being a bit small for a 3 year old, there isn't any reason I can't give it to her! :) Plus, then I would get to enjoy it, too! ;)
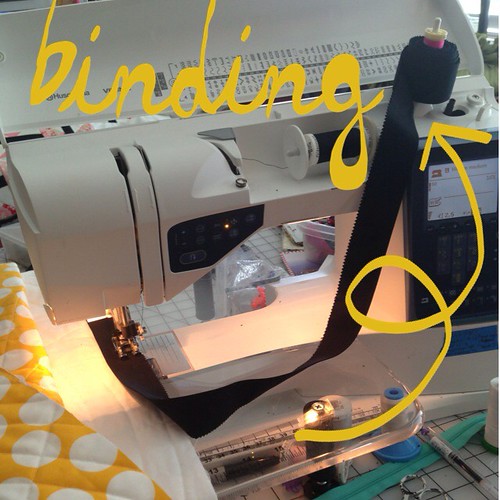
Do you know this trick when you're attaching your binding to your quilt? I either wrap my binding around a pencil or an old thread spool, and then stick it on the extra thread stand on my sewing machine. It really helps keep the binding straight and orderly while I'm attaching it. Sure beats the pile of binding I used to have on the floor!
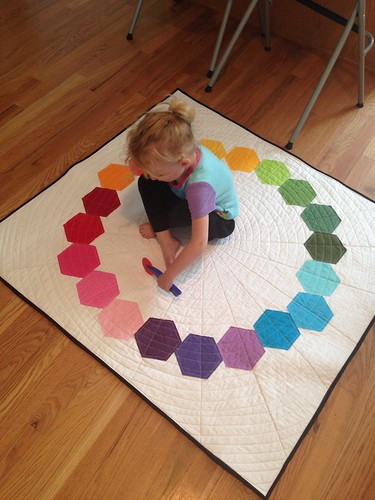
Here she is again! This time she is tracing the quilting lines with a play-doh cutter. :) Maybe she's just as attracted to rainbow quilts as I am... ;)
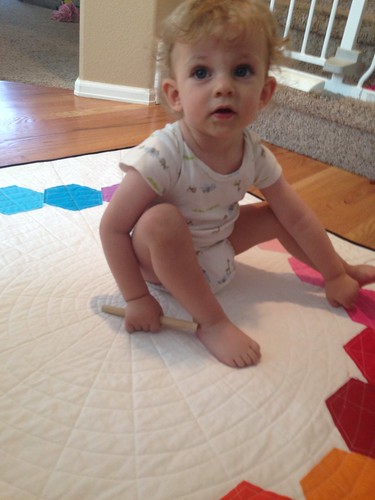
Uh oh! Buzz is making his move! Move over, sista! This one's MINE! ;)
It's hard to tell in this picture, but I backed it with a random yellow-and-white polka dot fabric I had. I'm happy to use something that I already had on hand. Going to the fabric shop with 3 little ones is NOT fun! For anyone! :)
You can see the quilting a little better here, I think. I realize it looks a bit like a spider web, but c'est la vie. I like it. And I have an even greater respect for spiders now! This web was TOUGH to weave!
I hope you enjoyed learning about my little hexagon quilt. Where else have you been on this Hexie Queen Blog Hop? Here is a list of the others that are posting today. If you haven't already been, you should go visit their blog! I am confident inspiration awaits. :)

A friend had sent her a picture from Pinterest, and she wasn't sure how to get to the original blog post and quilter. She found me, though! :) She told me all about the Hexie Queen Blog Hop, and it sounded like SUCH fun blog hop that I jumped in feet first! :)
So one Saturday, when I was supposed to be working on a million other things, including potty-training Little Bird, I decided to start my hexie quilt instead. She helped. ;) A couple of years ago, I participated in 5 rounds of the Hexie Swap on Flickr, and one round was all solids, so I had about 50 pre-cut hexagons, just waiting for a project! They were cut with the Accuquilt Go cutter, and they're perfect for a quick project like this!
Once Little Bird and I had decided on the colors we wanted to use, I set her free with her own stack of hexagons so she could make "her own" quilt. She didn't really do much with hers, but it gave me the chance to get mine all laid out. :)
The next step was to heat set the hexies in place with a hot iron. I used a random scrap of fabric to protect my iron from any overspray of glue.
The beauty of heat-setting them this way is that when I inevitably had to put the quilt away, I could go away trusting that the hexagons wouldn't move a millimeter. And little hands couldn't move them, either. Security is a good thing when you've got curious little helpers around the house! :)
A couple of hours later, I was able to come back to the quilt. I raw-edge appliqued each hexagon in place with a straight stitch 1/4" in from the edge. I didn't want to stitch over any other stitches, so I stopped where I started, and tied a knot on the underside of the quilt top.
When the quilt top was finished, I just felt like singing! It felt soooooo good to put the must-do list aside and just follow the inspiration for once!
And then it came time to quilt it. I had a hundred ideas (and two more after I started, ain't that always the way!), but I went with a straight line between opposite hexagons, and then a spiral throughout the whole quilt.
Here's Little Bird claiming "her quilt" once again. :) I've never made a quilt just for the fun of it, so I've never had the chance to have one of my children claim it as their own. I'm not sure if she really thinks this is for her, but, other than it being a bit small for a 3 year old, there isn't any reason I can't give it to her! :) Plus, then I would get to enjoy it, too! ;)
Do you know this trick when you're attaching your binding to your quilt? I either wrap my binding around a pencil or an old thread spool, and then stick it on the extra thread stand on my sewing machine. It really helps keep the binding straight and orderly while I'm attaching it. Sure beats the pile of binding I used to have on the floor!
Here she is again! This time she is tracing the quilting lines with a play-doh cutter. :) Maybe she's just as attracted to rainbow quilts as I am... ;)
Uh oh! Buzz is making his move! Move over, sista! This one's MINE! ;)
It's hard to tell in this picture, but I backed it with a random yellow-and-white polka dot fabric I had. I'm happy to use something that I already had on hand. Going to the fabric shop with 3 little ones is NOT fun! For anyone! :)
You can see the quilting a little better here, I think. I realize it looks a bit like a spider web, but c'est la vie. I like it. And I have an even greater respect for spiders now! This web was TOUGH to weave!
I hope you enjoyed learning about my little hexagon quilt. Where else have you been on this Hexie Queen Blog Hop? Here is a list of the others that are posting today. If you haven't already been, you should go visit their blog! I am confident inspiration awaits. :)
Thanks for stopping by today! I hope you enjoyed my little hexie project! :)
Labels:
Beyond The Stipple,
Challenges and Swaps,
Fabric,
Hexies,
Rainbow,
Sewing,
Small Hands,
Sprout
Wednesday, July 31, 2013
Palace Steps Tutorial - {Faith Circle} August 2013 Quilt
What am I doing? I'm kinda sitting here in shock! I can't believe it is August tomorrow! But it is, and it's my turn to design and quilt a quilt for the {Faith} Circle of the do.Good Stitches bee. I really like to keep the blocks simple. And the piecing simple. I've had to make complicated, convoluted, time-consuming blocks before, and while they look lovely, I don't think the person who receives that quilt will be any more blessed than the person who receives a quilt made with simple blocks. Amen? :)
So I spent some time the other night looking at different books and magazines, and came across the "Tumbling Down" block by Kim Deihl in Quiltmaker's 100 Blocks, Vol 4. I like the look of the finished quilt, but didn't like the idea that we would have to piece together a bunch of tiny squares. So I decided to modify it just a smidge, and instead of using squares, we will use strips.
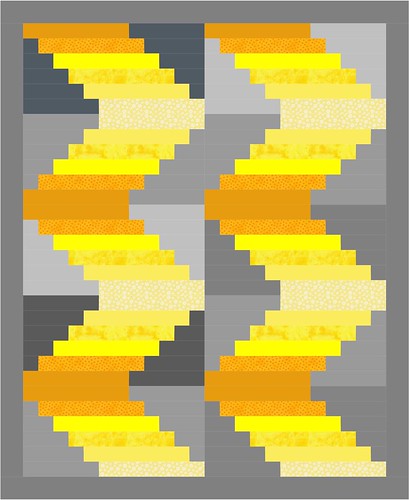
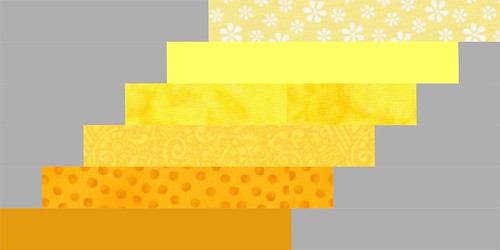
Here is a mock-up of the finished quilt:
Modern, simple, bright, a blessing...I hope so! :) We give quilts to Restore Innocence, which is an organization that provides assistance, housing, counseling and mentoring to young women rescued from sex trafficking all over America. They don't give a quilt to every girl rescued, mind you, but they do give them to girls that stay in the program. We have given them 6 quilts so far, and there are about 5 more in the works. :)
We will need two different orientations of block to achieve the ombre effect. Here are EQ7 mock-ups of each block. The finished size is 12.5" tall x 24.5" wide. Members of the circle will only have to make one block (woohoo!), and use 16 pieces of fabric. I think that qualifies as "simple"! :)
Block Orientation A (Stitchers will make this one)
And Block Orientation B (Quilters will make this one)
See how they're opposite? THAT is how it works! :)
So here's where the tutorial starts.
I hope it makes sense, and PLEASE ask questions if you have any! I'd much rather answer a question now than anyone have to remake a block later. :( Also, I am humble enough to admit that there more ways to make a block than my way. If you want to do it differently to achieve the same result, go for it! :)
Everyone will cut the same fabric.
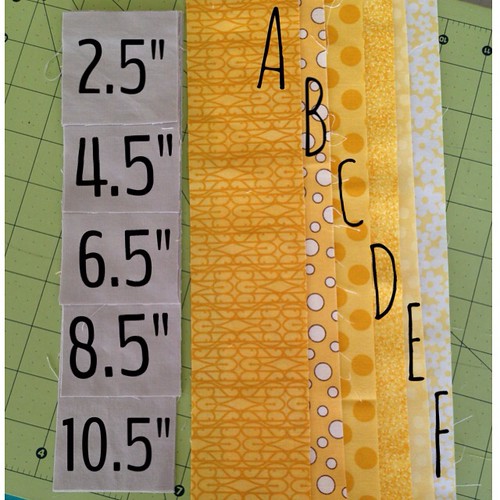
- Collect 6 pieces of varying shades of yellow (could be print or solid, but please be sure that it reads yellow). Arrange them from darkest to lightest, and label them alphabetically from A (darkest) to F (lightest).
- Cut one strip from each yellow that is 2.5" wide by 14.5" long.
- Now pick your gray solid. It needs to be a solid, and please keep it medium gray or lighter. The brand doesn't matter, but please use the same gray throughout your block. Kona grays that work are Medium Gray, Ash, or Iron. I don't have a color card for other brands, but just keep them on the light-to-medium side. :) You will need a total of 2 2.5" x WOF strips that you will cut.
- Cut strips of gray (2.5" wide) according to the following list. Cut two (2) of each: 10.5", 8.5", 6.5", 4.5", 2.5" It's a total of 64" of gray fabric.
Remember, you need TWO of each measure of gray, you just can't see it there because they're stacked together.
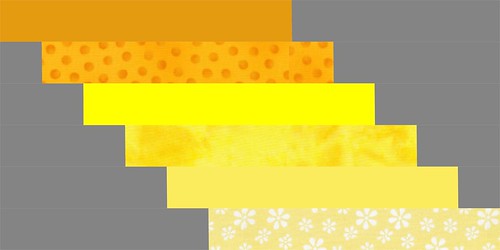
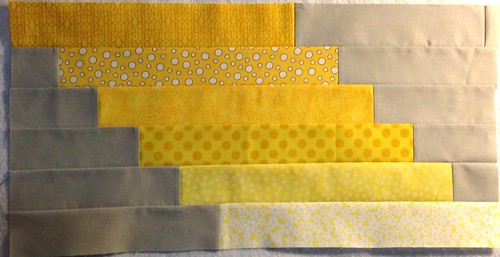
Here's a picture of my gray strips glue-basted to my yellow strips for Block A:
Stitchers, for Block A, you should attach your gray strips as follows, identical to mine.
Here's a picture of my gray strips glue-basted to my yellow strips for Block A:
Stitchers, for Block A, you should attach your gray strips as follows, identical to mine.
A -- 10.5" on right side (nothing on the left)
B -- 2.5" on left side, 8.5" on right side.
C -- 4.5" on left side, 6.5" on right side
D -- 6.5" on left side, 4.5" on right side
E -- 8.5" on left side, 2.5" on right side
F -- 10.5" on left side
The Quilters will do it opposite, and make Block B, to achieve the ombre effect. And for those of you who might still be reading, wanting to make this quilt, you should make 6 like that above, and 4 like this below:
Here's a picture again. :)
A -- 10.5 on the left side (nothing on the right)
B -- 8.5" on the left side, 2.5" on the right side
C -- 6.5" on the left side, 4.5" on the right side
D -- 4.5" on the left side, 6.5" on the right side
E -- 2.5" on the left side, 8.5" on the right side
F -- 10.5" on the right side.
Make sense? I hope so!! I sure hope so!! :)
Then press your seams, and sew Strip A along the long side to Strip B, and C to D, and E to F, then A/B to C/D, and then E/F to the bottom of A/B/C/D, and it should be perfect! You shouldn't need to even trim it! It should finish to 24.5" wide, and 12.5" high. Done!
See? Block A. Easy!
I hope you find this easy, and rewarding. Please please PLEASE let me know if you have any questions! :)
I'm linking up with Lee of Freshly Pieced, and her regularly-scheduled {WiP}Wednesday party. :)
Please note. As I stated, I was inspired by Kim Diehl's block. I have never seen a block like this, or a quilt like this. If someone else has already made one, I am happy to link to that quilt, although I won't say I was inspired by them. Because I wasn't. :) If you would like to notify me of another block or quilt like this, please feel free to email me at the address listed in my profile. Thank you for being polite.
Wednesday, July 17, 2013
{WiP} Wednesday ~ 29/52
I'm this close to finishing my do.Good Stitches quilt. I finally pieced the back the other day and spent less than 2 hours quilting it - and that includes thread and bobbin changes! Stippling is the way to go when you need a fast finish!
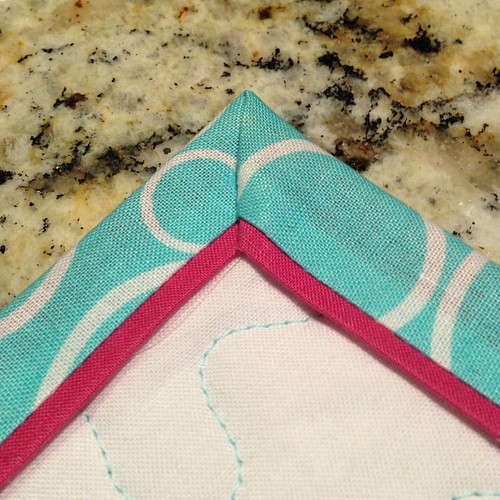
Here is a picture of the purdy mitered corner...
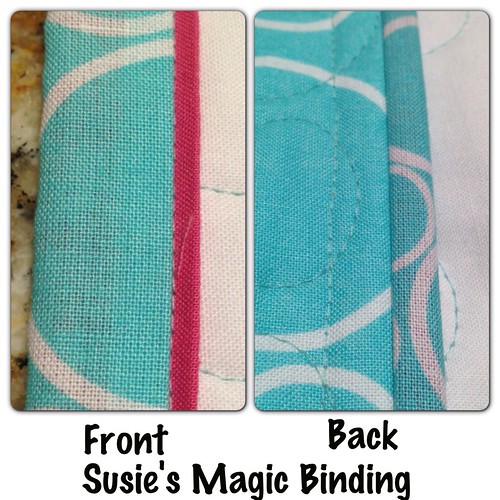
And here you can see the front and the back. Honestly, this is the closest-thing-to-perfect my machine binding has EVER looked!!
I'll put a label on it this week, and take it to Restore Innocence. They were very appreciative the last time I took them some quilts, and I know they are so happy to bless the girls with these quilts. :)
All that's left is the label, really. Last night I finished the binding -- it was magical!!! I used Susie's Magic Binding technique, demonstrated here on my friend Marti's blog. I stink stink stink at machine binding, so I wanted to try this, thinking maybe this will work and it won't look like something the dog rolled in! And it does! It does! It DOES!!
Here is a picture of the purdy mitered corner...
And here you can see the front and the back. Honestly, this is the closest-thing-to-perfect my machine binding has EVER looked!!
I'll put a label on it this week, and take it to Restore Innocence. They were very appreciative the last time I took them some quilts, and I know they are so happy to bless the girls with these quilts. :)
And then I'll put my sewing machine away. I've got a lot going on this weekend, and sewing isn't going to be a part of it. :( But then next week, I will put on a brave face and make Janice's paper-pieced blocks for our Bee Happy bee. I'm only marginally better at paper piecing than I am at machine binding!
And I've designed a few quilts that I am SUPER eager to make! Aunt Spicy is my partner in crime on these, and keeps encouraging me to make more! What a friend, right?!? And I loved getting back to the long arm. It seems I'm prolific at the first and last steps of the quilting process, but I'm a slow turtle at actually MAKING the quilts! I need to get faster. I have two baby quilts to make, and only know the gender of one of them. If the unknown is a boy, then I'll give my Huckleberry quilt I made when Latifah Saafir was here in May. If it's a girl, I'll do something quick and easy and double the recipe. ;-)
I am linking up with Lee at Freshly Pieced. Go check out the linky party. There's some beautiful stuff being made!
Wednesday, July 10, 2013
{WiP} Wednesday ~ 28/52
I am very aware of how blessed I am - and how much I take for granted. Really, I am. My life is FULL. Busy. Blurry from all the activity, really, and I know that will only get worse as the kids get older. But it's a good busy, a good full. I know that.
But it's exhausting, too. As an introvert, having 3 people in my face, on my leg, on my hip all day long can add to the exhaustion. So when they're all finally in bed, and the house is quiet, it's my time. My time to sew, or blog, or catch up on blogs, or read.
What? Read? What's that? :)
I'm just saying that it's all good. I wish I had time to sew more, and blog more, but the most important thing I can do every day is take care of my family. I know that. It's tiresome, but it's the right thing to do, and it's what I want to do! But I also want to be creative and productive and make this gigantic to-do list just an eensy bit smaller! :) That being said, I'm hoping to put a bit of normalcy back into my life, because it's been far from normal lately!
We just got back from a week in LA, visiting friends, visiting the LA MQG, visiting with some of my Bee Happy hive, going to Disneyland...for THREE days... ugh!
We've been home for 2 days now, and we're still trying to get back to normal and acclimate! It's not like we've got jet-lag, really...it's more like vacation-lag! :)
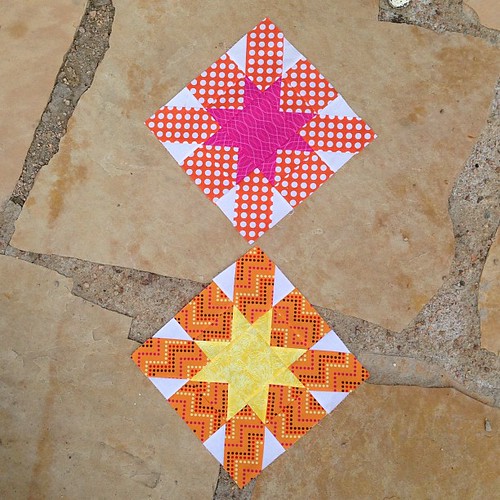
This is what I sewed just before we left. They are called Starburst Cross blocks, and they are for the Faith Circle of the do.Good Stitches bee. The tutorial is by Sew Crafty Jess., and it's going to be a stunning quilt! I just love the bright colors!
And then we left for California. It was a GREAT trip, really. Not long enough!
I took over a thousand pictures over the course of the week, but I won't hit you with all of them. I need to do a separate blog post about the whole trip just so I can remember it all! :)
Here are a few of my favorites, though.
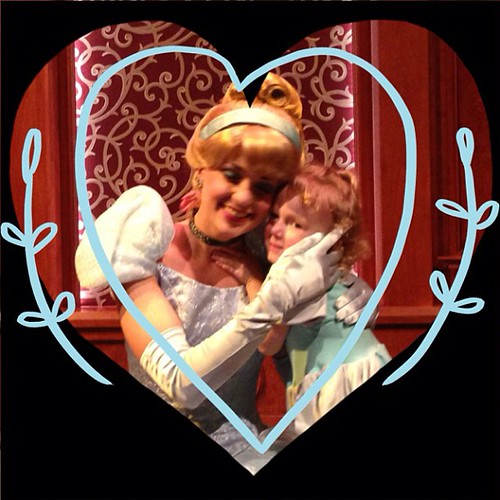
Hugging Cinderella after they twirled together in their dresses (Ramona was kind enough to let us borrow Bean's dress for the day!)
Waving back at Rapunzel who waved first. Starstruck. :)
Here's Buzz at the Mickey and the Magical Map show -- he was mesmerized!!
Our Disneyland passes had a blackout day on July 4th, so we went to the beach instead. It had been a very long while since Mookie had been to the beach, and I don't believe Sprout had ever been! And I know Buzz hadn't ever been! :)
Mookie really enjoyed the water, Sprout enjoyed the sand, and Buzz didn't really enjoy any part of it!
We went to California Adventures the next day, and after we had a spontaneous rendez-vous with Mr The Mouse himself...
...we headed for Monsters, Inc. Here's Buzz practicing his scream. It sounded a wee bit like his tiger roar, but it was darn cute!
Then after lunch, Dave took Mookie on the Grizzly River Run (think Thunder River...) She had a blast!
And on the third day, Dave and I split up so he could take Mookie on more big kid rides, and I could keep it simple with the little ones. We happened to see Rapunzel in her tower, which was kind of amazing.
Unfortunately, most of those pictures didn't turn out because, not surprisingly, it's kind of hard to manage an active one-year old while a three-year old meets her all-time favorite princess!
In the afternoon, we got to meet Tinkerbell, which was equally amazing, and equally hard to photograph! Honestly, I think the girls were kinda done having to smile for all the paparazzi! :) (they get that from their father...)
And then on Sunday we went to church and then spent some time with friends from church, and got ready for the journey home on Monday :( Sad and exhausting journey home.
Yesterday was a lazy, lazy day recovering from our wonderful trip, but last night I needed to really get down to business on the aforementioned gigantic to-do list, so I made my July blocks for the Faith Circle. This time it's Modern Cross Blocks, featured by Faith of Fresh Lemons in her Summer Sampler Series.
And tonight, I've got one more bee block for June, and I've got to piece a back, and maybe even get it loaded onto the long arm. Wouldn't THAT be grand!
It feels great to link up with Lee at Freshly Pieced. Go see what others are doing, and have a great week!
Subscribe to:
Comments (Atom)











.jpg)
