So I spent some time the other night looking at different books and magazines, and came across the "Tumbling Down" block by Kim Deihl in Quiltmaker's 100 Blocks, Vol 4. I like the look of the finished quilt, but didn't like the idea that we would have to piece together a bunch of tiny squares. So I decided to modify it just a smidge, and instead of using squares, we will use strips.
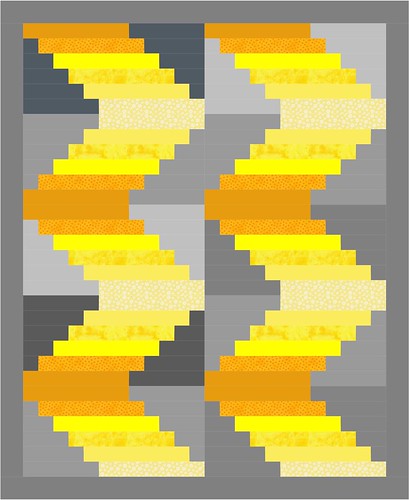
Here is a mock-up of the finished quilt:
Modern, simple, bright, a blessing...I hope so! :) We give quilts to Restore Innocence, which is an organization that provides assistance, housing, counseling and mentoring to young women rescued from sex trafficking all over America. They don't give a quilt to every girl rescued, mind you, but they do give them to girls that stay in the program. We have given them 6 quilts so far, and there are about 5 more in the works. :)
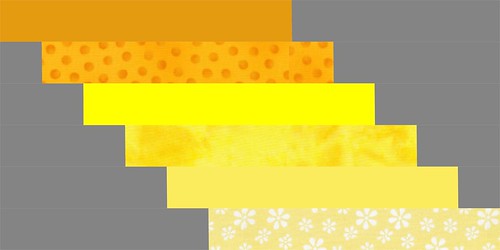
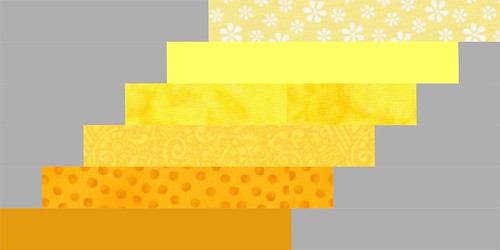
We will need two different orientations of block to achieve the ombre effect. Here are EQ7 mock-ups of each block. The finished size is 12.5" tall x 24.5" wide. Members of the circle will only have to make one block (woohoo!), and use 16 pieces of fabric. I think that qualifies as "simple"! :)
Block Orientation A (Stitchers will make this one)
And Block Orientation B (Quilters will make this one)
See how they're opposite? THAT is how it works! :)
So here's where the tutorial starts.
I hope it makes sense, and PLEASE ask questions if you have any! I'd much rather answer a question now than anyone have to remake a block later. :( Also, I am humble enough to admit that there more ways to make a block than my way. If you want to do it differently to achieve the same result, go for it! :)
Everyone will cut the same fabric.
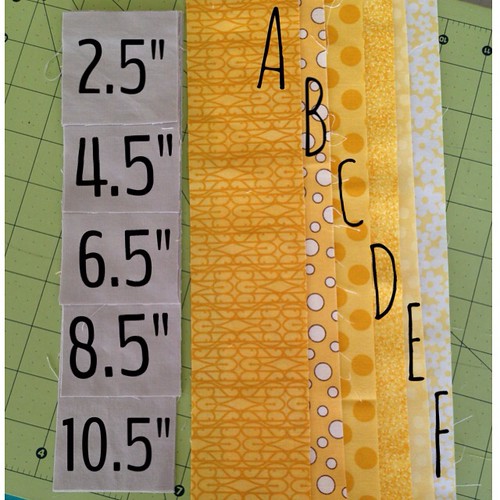
- Collect 6 pieces of varying shades of yellow (could be print or solid, but please be sure that it reads yellow). Arrange them from darkest to lightest, and label them alphabetically from A (darkest) to F (lightest).
- Cut one strip from each yellow that is 2.5" wide by 14.5" long.
- Now pick your gray solid. It needs to be a solid, and please keep it medium gray or lighter. The brand doesn't matter, but please use the same gray throughout your block. Kona grays that work are Medium Gray, Ash, or Iron. I don't have a color card for other brands, but just keep them on the light-to-medium side. :) You will need a total of 2 2.5" x WOF strips that you will cut.
- Cut strips of gray (2.5" wide) according to the following list. Cut two (2) of each: 10.5", 8.5", 6.5", 4.5", 2.5" It's a total of 64" of gray fabric.
Remember, you need TWO of each measure of gray, you just can't see it there because they're stacked together.
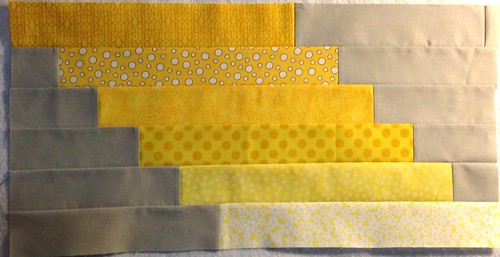
Here's a picture of my gray strips glue-basted to my yellow strips for Block A:
Stitchers, for Block A, you should attach your gray strips as follows, identical to mine.
Here's a picture of my gray strips glue-basted to my yellow strips for Block A:
Stitchers, for Block A, you should attach your gray strips as follows, identical to mine.
A -- 10.5" on right side (nothing on the left)
B -- 2.5" on left side, 8.5" on right side.
C -- 4.5" on left side, 6.5" on right side
D -- 6.5" on left side, 4.5" on right side
E -- 8.5" on left side, 2.5" on right side
F -- 10.5" on left side
The Quilters will do it opposite, and make Block B, to achieve the ombre effect. And for those of you who might still be reading, wanting to make this quilt, you should make 6 like that above, and 4 like this below:
Here's a picture again. :)
A -- 10.5 on the left side (nothing on the right)
B -- 8.5" on the left side, 2.5" on the right side
C -- 6.5" on the left side, 4.5" on the right side
D -- 4.5" on the left side, 6.5" on the right side
E -- 2.5" on the left side, 8.5" on the right side
F -- 10.5" on the right side.
Make sense? I hope so!! I sure hope so!! :)
Then press your seams, and sew Strip A along the long side to Strip B, and C to D, and E to F, then A/B to C/D, and then E/F to the bottom of A/B/C/D, and it should be perfect! You shouldn't need to even trim it! It should finish to 24.5" wide, and 12.5" high. Done!
See? Block A. Easy!
I hope you find this easy, and rewarding. Please please PLEASE let me know if you have any questions! :)
I'm linking up with Lee of Freshly Pieced, and her regularly-scheduled {WiP}Wednesday party. :)
Please note. As I stated, I was inspired by Kim Diehl's block. I have never seen a block like this, or a quilt like this. If someone else has already made one, I am happy to link to that quilt, although I won't say I was inspired by them. Because I wasn't. :) If you would like to notify me of another block or quilt like this, please feel free to email me at the address listed in my profile. Thank you for being polite.



Looks like a plan!
ReplyDeleteThanks for this! It'll be a week before I get going on them, but will definitely be back when it's time - thanks.
ReplyDeleteGreat tute! I might have to start mine sooner than later because it looks fun and simple! (I've been wrestling with zippers all day, argh!)
ReplyDeleteI love it! The quilt is going to be fantastic.
ReplyDeleteIt's great, I like this block and the yellow gradation! I might be going to Colorado, anything I shouldn't miss?
ReplyDeleteLove the simple strips and colours. Can't wait to see the finished quilt. Was in Colorado last year visiting from Australia, loved it.
ReplyDelete